Using Builder§
All the base knowledge we assume at the start of this workshop can be learnt from this 15 minute video
This shows you how to make the ‘posnerHand’ demo available from previous examples
What makes a PsychoPy experiment?§
Open the posnerHand.psyexp file. An experiment in Builder has:
- a single Flow (specifies the order in which things occur and whether they repeat in a Loop)
- one or more Routines that are combined in the Flow
- several Components that are combined to form Routines
The conditions file§
Open the conditions.xlsx file…
If you are going to change something on every repeat of a routine (e.g. stimulus location changes on each trial) you can use a Conditions file. This is fed into the loop surrounding the routine.
Each header is a parameter, each row corresponds to the value of that parameter on each repeat/trial.
Let’s practice making minor edits§
- Add some instructions
- Gather some additional info (e.g. age)
Warm up exercises (5-10 mins)§
- Add a ‘neutral’ condition to our task (find a double headed arrow for the neutral stimulus)
- Add a ‘thanks’ message to tell participants when they end the experiment.
- in the thanks routine ask participants to click a button with the mouse to end the experiment.
When you are finished, come back to the main session and collect one run of your task so that we can talk through the data file.
Block designs and counterbalancing§
Randomised block designs§
A block design is where we have sets of similar trials organised into blocks rather than having trials interleaved.
- e.g.
- a block of faces to recognise or a block of houses
- a faces oriented correctly and faces inverted
- a block of Stroop task in English and a block in French
Note: these are all cases where the components would be identical between blocks.
The natural error§
The biggest error that people make with this is to create a Routine (and a loop) for each block of trials:

Then they ask on the forum, “How do I shuffle the blocks on my Flow?”
That is the wrong way to think about it (for blocks with identical components).
The right way§
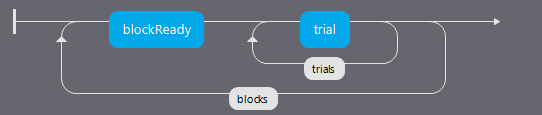
Instead of a Routine for each block, create a Routine for all your trials and make it behave differently across the blocks:

Then you can set the conditions files in your blocks loop to control the block-level changes.
The outer “blocks” loop then takes a (meta) “conditions” file that specifies which of the conditions files will be loaded in each block.
The right way§
Imagine we want to extend our Posner task to include a block where invalid trials occur on a higher proportion of trials.
We need to create a total of 3 conditions files:
- conditionsA.xlsx
- conditionsB.xlsx
- blocks.xlsx
The right way§
blocks.xlsx:
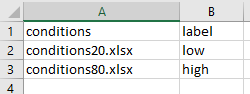
The label variable isn’t technically needed but it could be used to tell people what block they are about to enter. The point is that you can still use other variables here, defined at the block level of the program.
The right way§
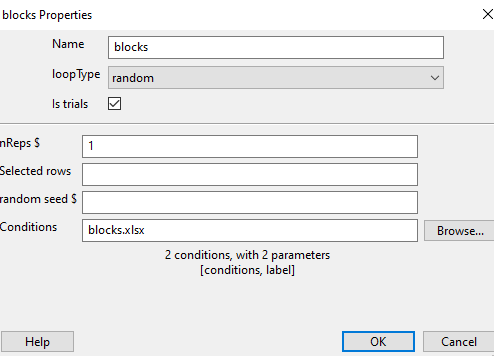
Now we need to set up the variables inside our experiment:
- the inner (trials) loop will have a conditions file = $conditions which is defined in the blocks.xlsx file
- the outer (blocks) loop will have conditions file = blocks.xlsx
The right way§
The right way§
We could also tell the participants what kind of block they are about to enter, we can add a text object that takes:
$label
Randomised block design complete!§
You’ve sorted out block designs in a relatively neat fashion.
Just keep clear what differs from one block to the next (for a conditions file) and what stays the same (for the Routine definition).
Counterbalancing§
Counterbalancing your blocks is really just an extension of the blocking scenario, except that you set the blocks to operate in a particular order rather than leaving PsychoPy to randomise them.
Setting the order§
At the moment, PsychoPy doesn’t handle the ordering for you - you need to decide how to create the orders and how to assign participants.
So, you need a file per conditions order (e.g. A -> B and B-> A) and then set the blocks loop to be sequential rather than random to preserve the order you set.
How to assign participants to a group§
Easiest way is by hand at the start of the run for the participant. The steps are:
In Experiment Settings add a field for group (which will be A, B, C… for however many orders you need)
For the block loop use that value by calling expInfo[‘group’] using one of the alternatives below:
$"block" + expInfo['group'] + ".xlsx"
$"block{}.xlsx".format( expInfo['group'] )
Note: This second kind of formatting is termed an ‘fstring’ in python - we will talk about that more later.
Exercises§
Let’s practice counterbalancing in different ways using the counterbalancing exercises in the demo folder. In “excercise 1” you will find a non efficient counterbalanced design. We want to improve this in 2 phases.
- Turn this inefficient design into a randomised block design. (the cat and dog images are presented in blocks, but in a random order)
- Then turn this into a counterbalanced design. So that group A see cats first and group B see dogs first. (You should be able to input group in the GUI at the start)
When you are finished, come back to the main session, if you run into any error messages please share them (on slack) and we can discuss them.
Counterbalancing subtasks§
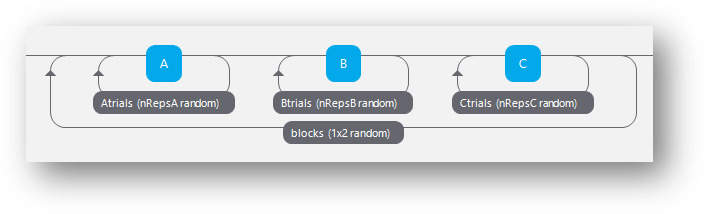
Sometimes we might have to counterbalance subtasks (i.e. routines that contain very different sets of components)
You can wrap a loop around any set of routines and control if it presents using nReps.
Counterbalancing subtasks§
In the below we could control create the order C->B->A by using a conditions file where the nReps of each subloop are set per iteration of the outerloop.
Counterbalancing subtasks§
e.g. using a conditions file like this…
| nRepsA | nRepsB | nRepsC |
|---|---|---|
| 0 | 0 | 1 |
| 0 | 1 | 0 |
| 1 | 0 | 1 |
Where the nReps argument of each subloop is set using something like ‘$nRepsA’ ect.
Exercise§
Open exercise 2 in the counterbalanceExercises folder. This is very similar to our last task, but this time our two routines present different kinds of components, so we need to use a different method of counterbalancing.
We want a design where groupA sees cat images first and group B sees cat words first. Counterbalance this flow using the nReps arguments in the loops.
All done§
You can now create trials and blocks in any order, fixed or random and counterbalance subtasks!
You’re in complete control (but you need to understand what orders you want!)
Up next