Using Builder to create your experiment
Generating ‘standard’ paradigms in Builder is generally easier than writing the code yourself. Being able to write code helps you do things that a graphical interface can’t.
Compiling your experiment to python or JavaScript
A first step to combining your code with a Builder is to compile a builder script to coder and peek what’s “under the hood”.

Compiling your experiment to python or JavaScript
Compare this with scripts you may have written:
- much more code than we needed
- especially more complicated code to
- start/stop each stimulus/component
- determine whether all the components are finished (i.e. trial is over)
- rather little re-use of code
Builder doesn’t know your intentions so plans for everything
Compiling your experiment to python or JavaScript
Many similar concepts:
- similar imports
- initialization of objects
- creating a dialog box from a dictionary
- TrailHandler(s) and ExperimentHandler
Compiling your experiment to python or JavaScript
It can be useful:
- to get ideas for how to do things
- to find out what variables a Builder experiment ‘knows’ about e.g.:
- t is always the current time in sec since the start of the Routine
One-way streets
You could save and run this exported script (that’s what Builder does each time you press run).
You could tweak this code and see the effects your edits have on the running of the experiment.
If you do your changes will NOT be reflected back in the Builder experiment.
Hacking the script is useful to see how things work but it’s better to add your edits back into the Builder view.
Code “as arguments”
Most dialog entries have the option to take raw Python code if you start your entry with $ (or have that by default).
You can use this as more than a variable from your conditions file e.g.:
- set a random value (e.g. onset, position)
random() - set a text object to have text
"ABC"[randint(3)]and have it update every repeat
NB. If you actually need a dollar symbol to be in your text, do:
- $”You won $5” [include the quotes]
Code "as arguments"
Using code as arguments allows us to easily make stimuli ‘dynamic’ (i.e. things change their attributes in time).
e.g. a shape that tracked the mouse by setting the shape position to be mouse.getPos()
Code “as arguments”
Making things dynamic could allow you to, for instance:
- gradually reveal an object
- make an object move to make the task harder
- make an object more interesting for participants (e.g. developmental)
Code Components
This goes to the next step in integrating code with your experiment. You can add code in either python or JavaScript (JS). By default, python code will be transpiled into JavaScript.
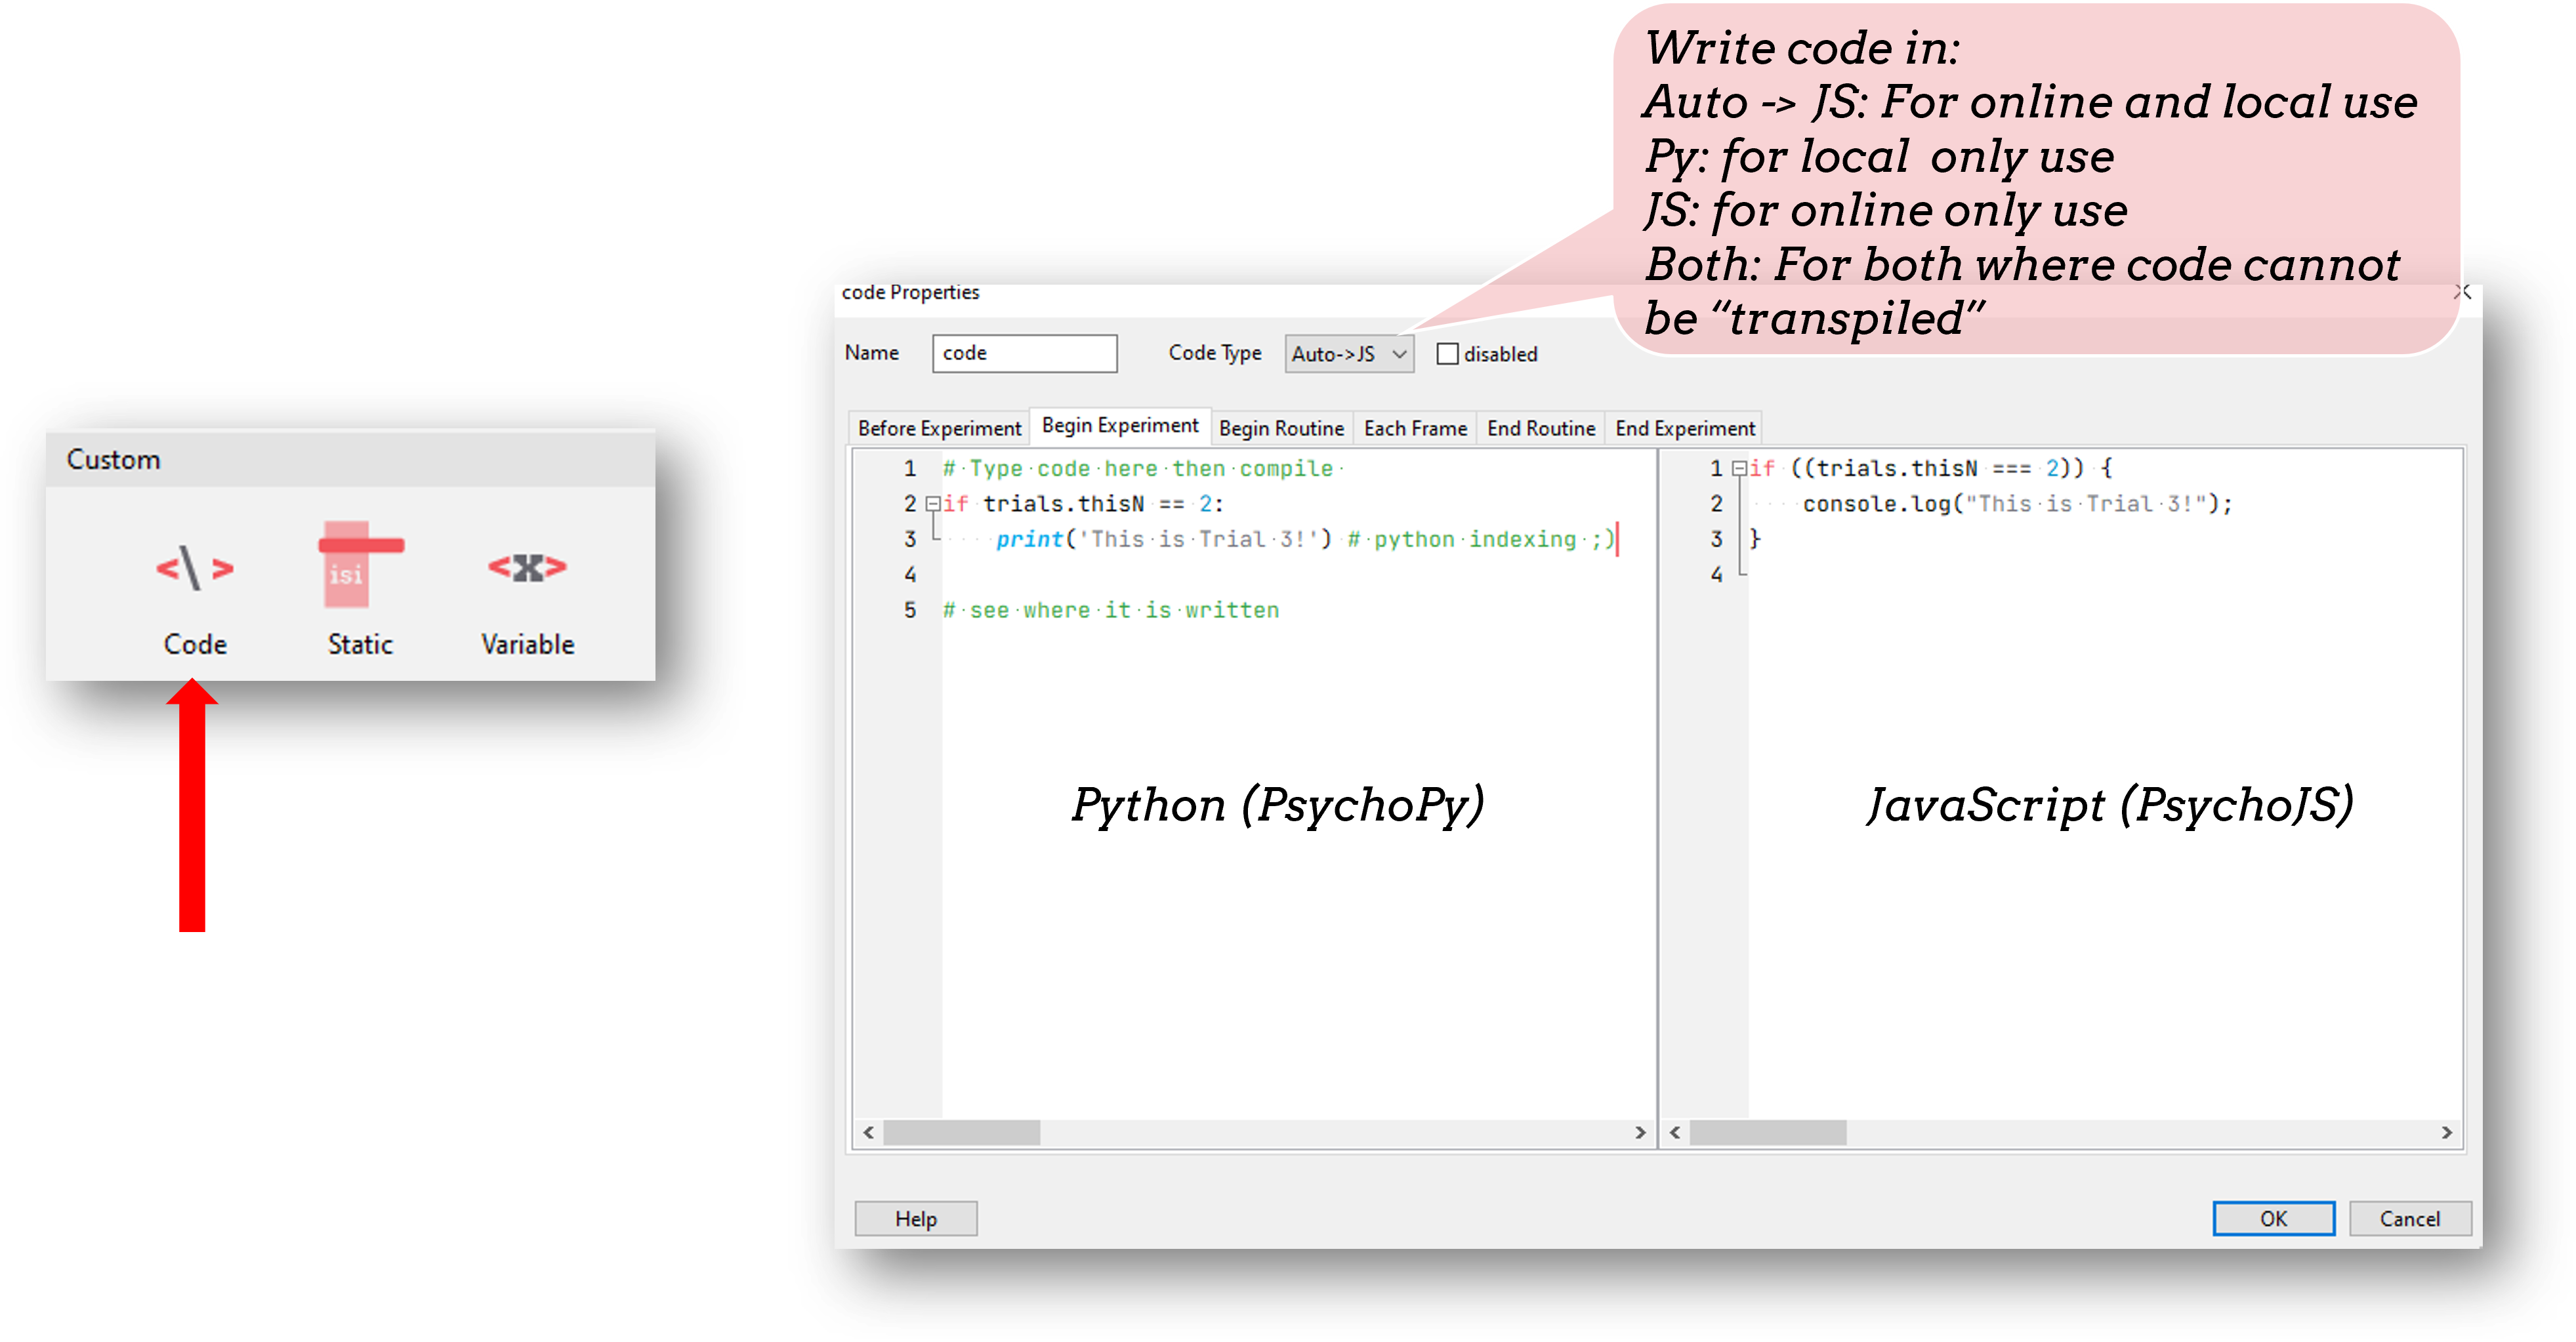
Code Components
A Code Component allows you to add Python (and now JS) code at 6 different points in the script:
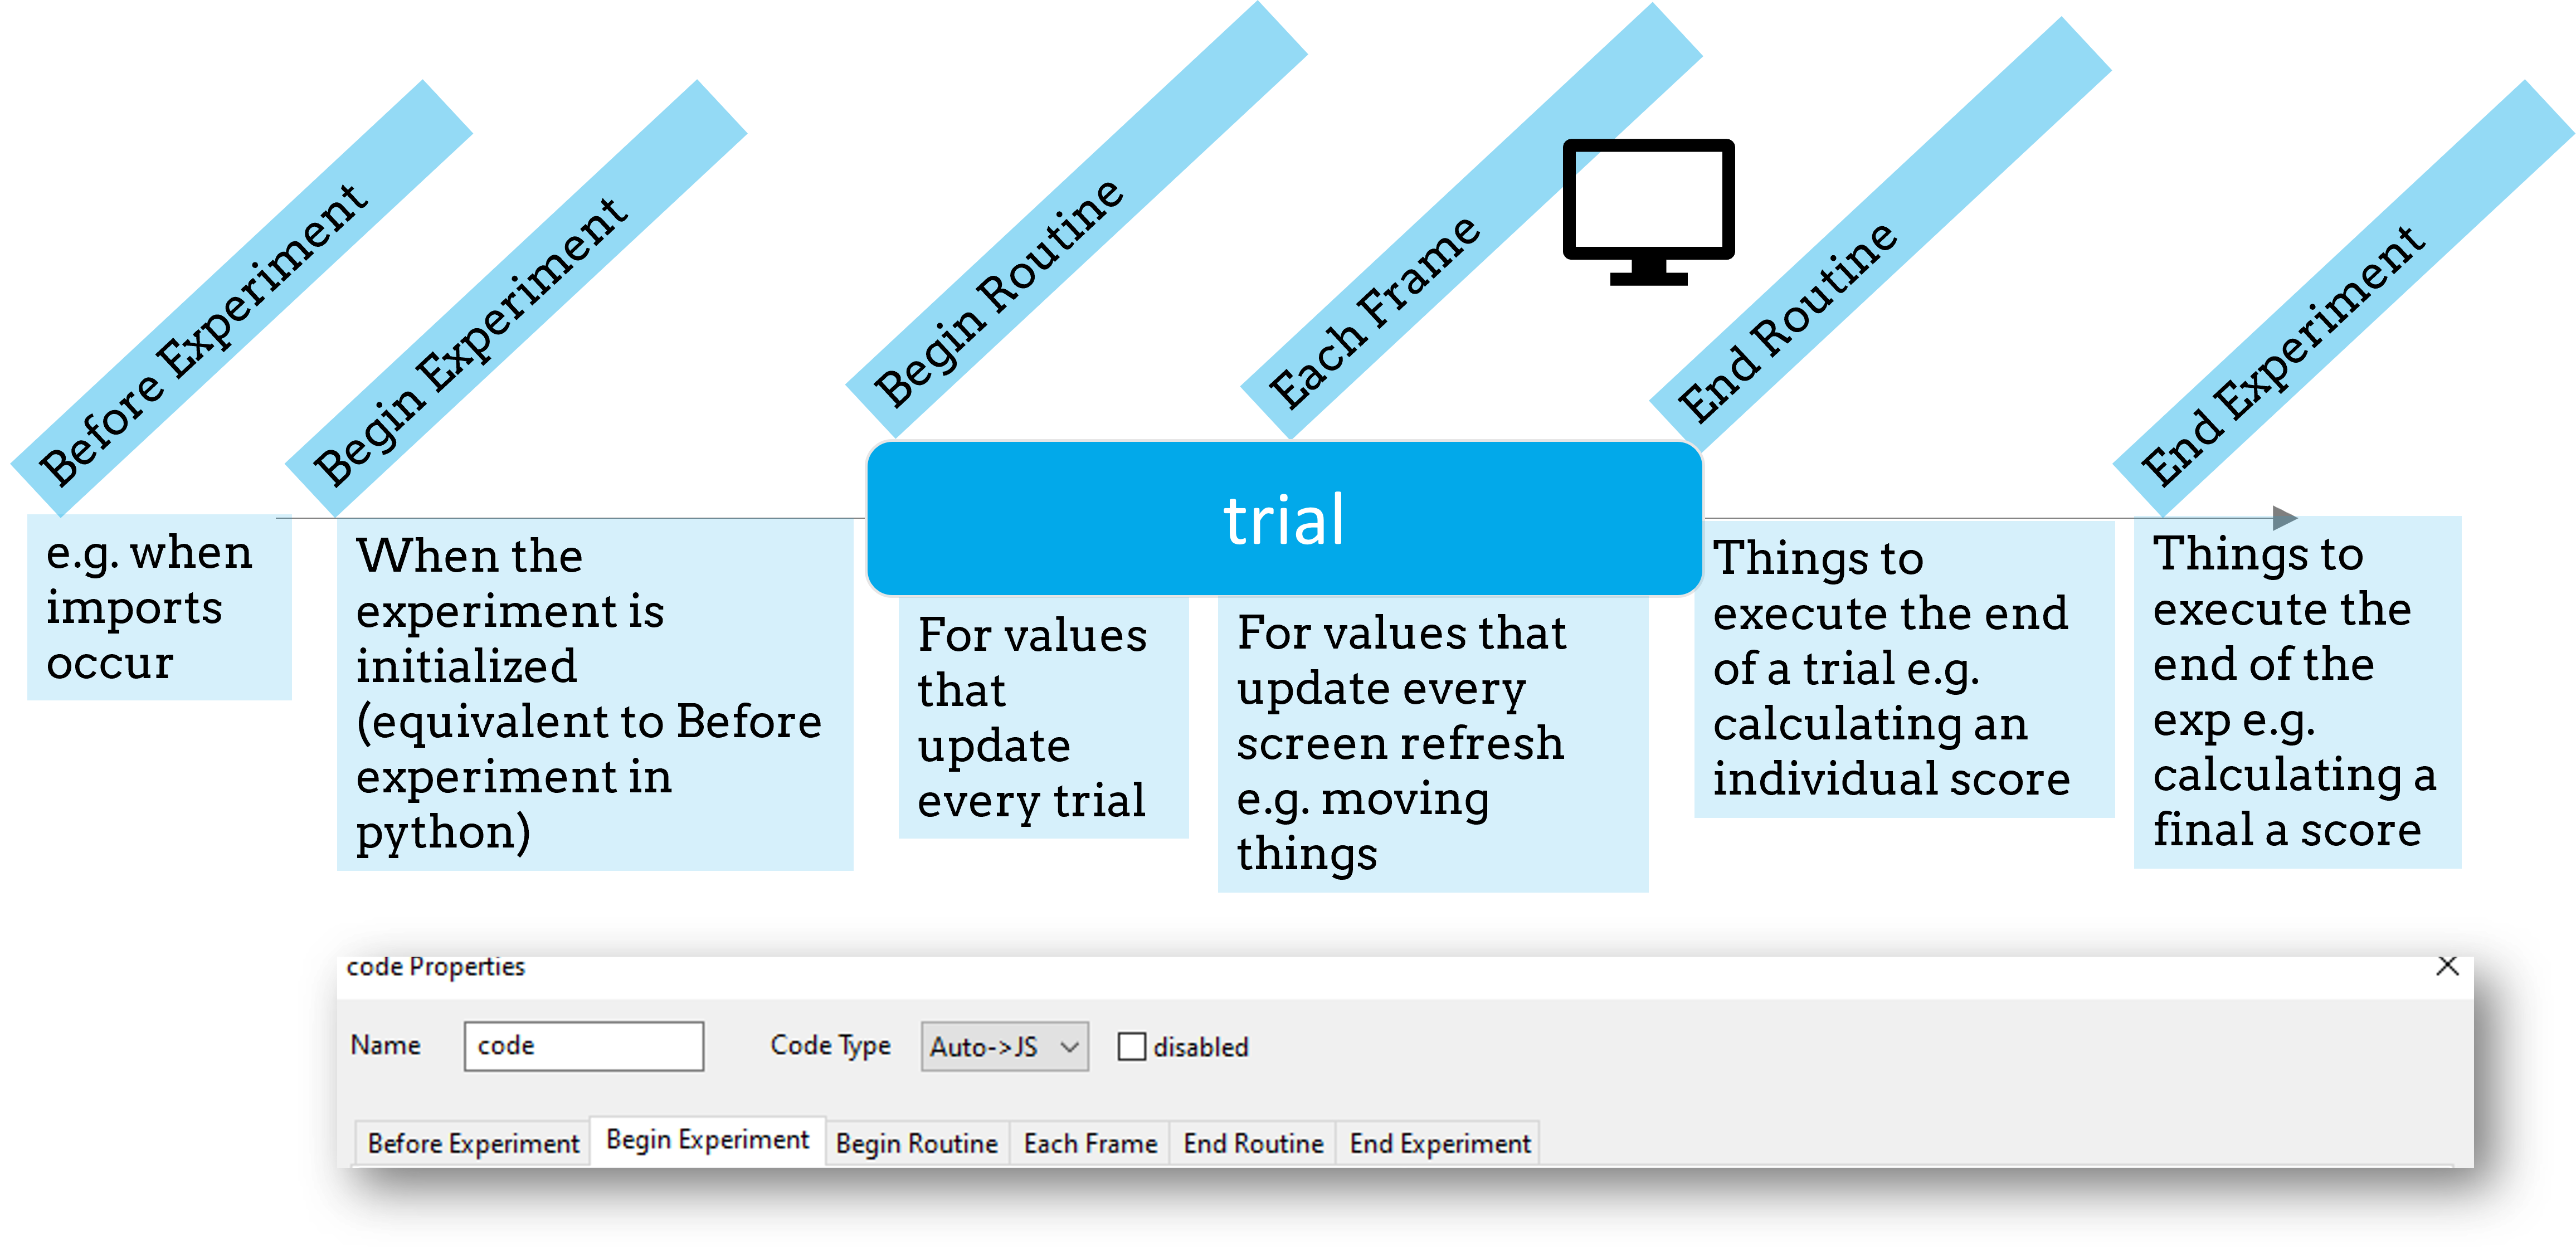
Code Components
The order of execution is important.
Each entry of your Routine has multiple Components and their code /for each part of the experiment/ is run in the order of the components.
Do you want you custom code executed before or after your stimulus?
Note
Handy side tip. If you want to see what properties and methods an object has, you can use dir() for example to inspect the properties of the mouse you could use print(dir(mouse)).
If you want to learn more about a method in an object you can print the docstring for that method print(mouse.setVisible.__doc__)
The dir() method is a python specific function - so be careful if you leave that in your code when pushing your experiment online!
Adding feedback
Trial-by-trial (from a key press)
When we use a keyboard component for our responses, there are a few variables returned on the key press:
key_resp.keys: Key name(s) that were pressed.key_resp.rt: The response time(s) of key presses.key_resp.corr: If a correct answer was provided to the component (under “Data” tab) this will return 1/0 for if the response was correct/incorrect.
Trial-by-trial (from a key press)
Following this you could use a code component to give response dependent feedback:
if key_resp.corr:
   feedback = ' Correct!'
else:
   feedback = 'Incorrect'
Using $feedback in a Text component.
Overall feedback (from a key press)
Sometimes we might want to tell our participant how well they did overall. For example, we might want to tell them the percentage of correct answers they got.
Overall feedback (from a key press)
For this we would need two variables, the number of trials and the number of correct responses.
In the Begin Experiment tab, we could use:
accuracy_list = []
Then in the End Routine tab we could use:
accuracy_list.append(key_resp.corr)
Overall feedback (from a key press)
Finally, at the end of our experiment we could add a text component and use some code in the text field:
$'You scored' + str((sum(accuracy_list)/len(accuracy_list))*100) + '% correct!'.
If you want to be kind to future you, you could even save this summary variable to your data file by adding a code component to your last routine:
thisExp.addData('percent_correct', (sum(accuracy_list)/len(accuracy_list))*100)
Exercise (20 mins)
- set the color of the trial-by-trial feedback to be green if the response is correct and red if incorrect.
- download the images here to show a celebration image if the answer is correct, and a sad face if incorrect on each trial.
- make a list to track response time over trials and tell participants their average response time at the end. Hint: you can get the average of a list using
average
More code examples
Inserting a timer
To show the participant the time into a trial, we don’t even need a code component. We can add a Text stimulus, and in the Text field write str(t) (t is a special variable that lives under the hood of PsychoPy, it indicates the time since the trial started) then make sure to set the field Each frame. This is a good example of converting variable “types” in python:
str(): Converts to a string.int(): converts to an integer.
Inserting a timer
This might return a value that is quite long, so, to round that we could use round(t, 3)
Ending a set of trials early
Imagine we want a set of practice trials, that will end when your participant gets 5 correct.
You can use the code trials.finished = True to end a loop early. So, you could say:
if totalCorrect >= 5:
   practice_trials.finished = True # practice_trials is the name of the loop
Ending or skipping a routine
Imagine we want to skip a routine/trial (for example to only show a routine on some trials). You can add a code component and use:
continueRoutine = False
To end or skip a routine.
Ending or skipping a routine
This can be extended to insert a break. The modulus operator % can be used to say if a number has any remainders following a division, so, if we want a break every 5th trial we could add a routine in our trial loop called “breakMsg” and add a code component with the following in the begin routine:
if trials.thisN + 1 % 5 > 0:
     continueRoutine = False
Note that we add 1 because python indexing starts at 0.
Making a branched experiment
A branched experiment refers to an experiment in which one of two paths could be taken, depending on the response given. A very basic example of a branched experiment could be if the participant chooses to consent or not, if they do consent the experiment progresses, otherwise the experiment skips to a thank-you message.
Making a branched experiment
Add a Routine to the start of our experiment called “consent” and add two clickable images (one called “Yes” and one called “No”). Then add a code component, and in the End Routine tab, write:
if consent_mouse.clicked_name[-1] == 'Yes':
   mainLoopReps = 1
else:
   mainLoopReps = 0
Then add a loop around the rest of your experiment and use $mainLoopReps in the nReps field. This is a basic example, but you could imagine how this could be used for other branched experiments to show different parts of your experiment to different participants.
Randomizing the position of stimuli (e.g. images)
Imagine you have 4 images to present in 4 locations. On each trial, you want the location for each image to be selected randomly. You could add a code component, and in the Begin Routine tab write:
xList= [-.5, -.25, .25, .5]
shuffle(xList)
Then in the position field of each image component use [xList[0], 0], [xList[1], 0] and so on… making sure to set every repeat
Storing custom variables
It is really handy to be able to save custom variables to our data file. Following the example of randomizing image position, we could save the xlist to our data file using thisExp.addData('xList', xList) the function addData() takes 2 arguments - the first is the value for the column header in the output file, the second it the value of the variable to save.
Trial counters and clocks
Trial counters
How is PsychoPy counting trials?
Each loop we add to our experiment will automatically be counting the number of trials that have occurred already (as well as how many repetitions of our trials list have occurred!). Run your experiment and have a loop at the output. You will see some useful information in the headers of your file.
How is PsychoPy counting trials?
trials.thisRepN- the current repetition of your conditions filetrials.thisTrialN- the current trialN within this repetitiontrials.thisN- the current trialN regardless of repetitiontrials.thistrialIndex- the index of the current trial from within our trialList (the conditions spreadsheet).
Showing trial progress
Now we know how PsychoPy counts trials, we can use this info to add a trial counter and show how far through the experiment participants are. Add a text component and position it in the top left (in height units pos = (-0.4, 0.4)). In the text field add $'Progress: ' + str(trials.thisN) + '/' + str(trials.nTotal).
Clocks
Keeping track of time is really important to most experiments. In PsychoPy there are many useful clocks that live “under the hood”, which we can use in our experiment:
t: the variable t represents the time since the start of the current routine anyway!
Making custom clocks
If we want to use a custom clock (e.g. to measure the time across several routines) we can always make a clock within a code component:
myClock = core.Clock()
Note
In the current release (2021.2.3) if we are working online we will need to change our code component “type” to be “Both” and use myClock = util.Clock() on the JS side.
Useful methods for use with clocks
Once we have our clock there are several useful methods we might want to know about.
.getTime(): fetches the time on the current clock (note that we don’t need to do this fortbecause t represents the time on the current routine clock rather than a clock itself).reset(): resets a clock - note that this is OK on our custom clocks, but it is best that we don’t reset any of PsychoPy’s inbuilt clocks.
Adding a timer to your experiment
Now that we know how to make a clock and how to access the time on it, we can easily add a timer to our experiment to show our participant how far into a trial, or the experiment they are.
Adding a timer to your experiment
Add a text component to your trial routine and position it in the top right corner (in height units you will want something like pos = (0.4,0.4). Then in the text field all we need is to write $t and set every frame.
Note
Depending on your PsychoPy version you might need to use t - omitting the dollar sign. Remember that you only need a $ at the start of a field if there is not already a $ int he parameter name.
Adding a timer to your experiment
The properties of the text component should look like this:

Adding a timer to your experiment
OK now you should have a timer to show participants how far through a trial they are!! If you wanted to show them how far into the experiment they are you could add a code component and in the Begin Experiment tab write expClock = core.Clock(). Then in your text component replace t with expClock.getTime().
What next?
Let’s get things moving, and talk about Making things dynamic