Setting up version control
many tutorials on the web for this
just the basics here
What is version control?
A way to go “back and forth in time” to avoid endless file-naming
FinalVersion1.docxFinalVersion2.docxUltimateFinalVersion1.docxetc.
For single documents, cloud-based platforms have a Version History
e.g., in a Google Doc:
File > Version History
For a larger project, with multiple files and folders, there are several tools, the most popular of which is currently Git
What is Git?
the most dominant tool worldwide for tracking and managing changes to software code and documentation
tracks an entire folder and everything underneath (not just a single file)
repository
the folder (and all its subfolders) that you’re tracking
runs on your computer (not online)
NOTE: Git works best with plain-text documents (UTF-8 encoding included), but not binary files like Microsoft Word or Excel documents
What is GitHub?
a web-based service (not on your computer)
centralizes Git repositories in the cloud
(literally an online hub for Git repositories)
simplifies collaboration
Basic Git workflow and terminology
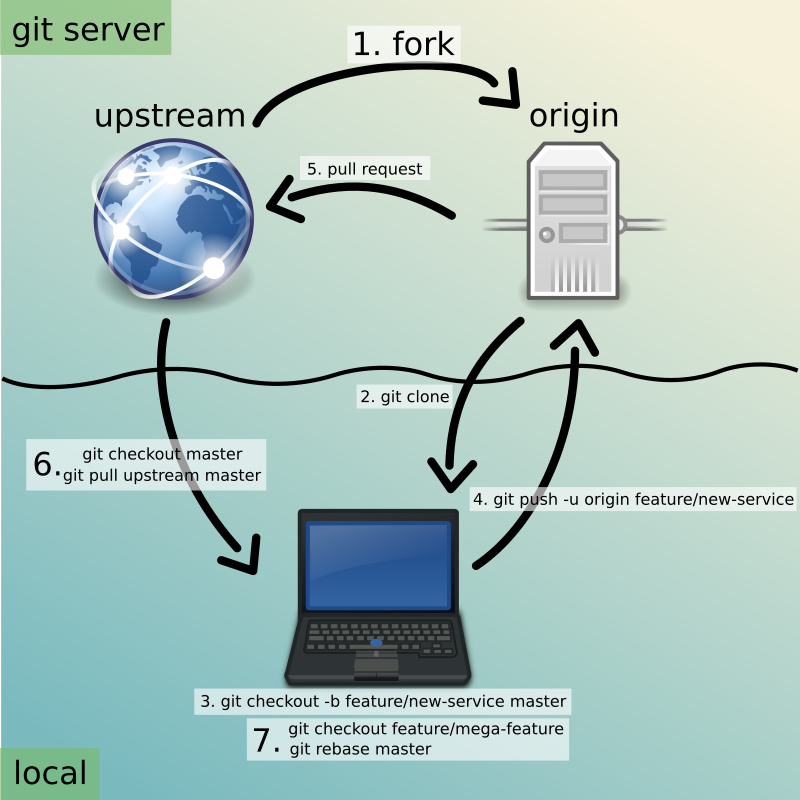
(Creative Commons license, courtesy of openclipart.org, image 278845, git-opensource-workflow, by developingo)
Setting up the Git workflow: step by step
Now we’ll go through setting up the Git workflow for PsychoPy®
Step 1: Get Git and GitHub working
Git is free software for your computer
GitHub is an free online system, which you need to sign up for
Step 1a: Install Git
download Git here
(the binary installer is easiest)
You can just choose the defaults
If you need it, the following YouTube video quickly shows you how to do this on both Mac and Windows
The Windows installation process involves clicking through more screens
Step 1b: Sign up for GitHub
Go to GitHub online
Click the following button:
Sign up for GitHubProvide your email, then create a password and username
Verify that you’re a human
Enter the launchcode that was sent to your email
You can accept the defaults through the rest of the options
If asked How many team members will be working with you?
Just answer with:
Just me
Step 2: Fork the psychopy repository
What is forking on GitHub?
for most users
just copying an existing repository already on GitHub somewhere
and making it your own, on your own, online GitHub account
NOTE: Technically and more generally, it’s copying a repository, while also disconnecting it from other previous committers
Step 2a: Find the psychopy/psychopy repository
While logged in to GitHub
Go to the search box at the upper left
type in: psychopy
You should see the following at the top of the search list: psychopy/psychopy
Click it
You should land here: https://github.com/psychopy/psychopy
You could also just type that URL in to your browser
Step 2b: Fork the psychopy/psychopy repository
Find the
Forkpull-down menu located near the upper right corner
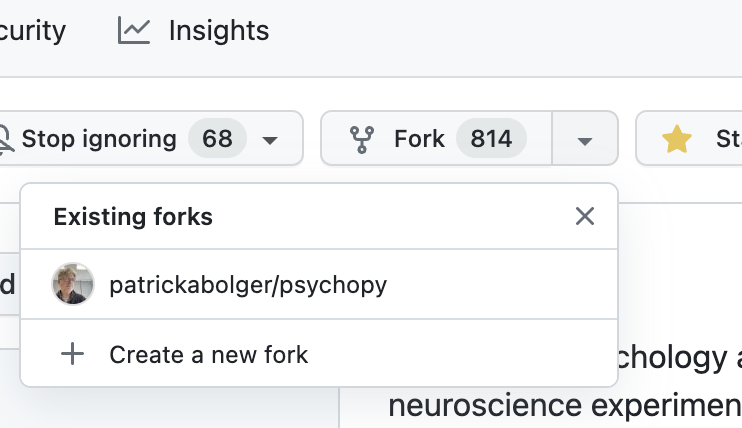
Choose the following:
+ Create a new forkIMPORTANT: Be sure to UN-Check the box labeled as follows:
Copy the ____ branch onlyIn other words, please copy all the branches
What is a fork?
a fork is your own (online) copy (on GitHub) of the all the code required to build the current (in this case, release) version of PsychoPy®
it is “yours” in the sense that…
it is now disconnected from all other users
you are free to modify it
for your own purposes* (it’s open source, after all); or
in order to contribute back to the project (more common)
In fact, the latter is what you’ll be doing as translators
* though you still need to abide by the the particular license that applies to PsychoPy®
Step 3: download a tool to avoid using the command line (for now)
Command-line Git actually turns out to be very useful
You may eventually learn it anyway (responses to online requests for help often come in the form of the CLI)
But it is often intimidating at first
So there are many GUIs to make Git easier to use
Popular tools
popular, but relatively complex GUI tools for working with Git
GitKraken, PyCharm, Visual Studio Code, etc.
ideal starter option for translators:
Why?
free
retains the native terminology of Git
simpler, and therefore, less confusing
What if I use Linux?
GitHub Desktop not natively designed for Linux
If you’re using Linux, try one of the following:
install the GitHub Desktop fork for Linux (see more options on the the shiftkey/desktop fork)
install GitFiend, which is cross-platform, but originally designed for Linux
just as easy to use as GitHub Desktop, perhaps easier
works on Windows and Mac as well
Step 3a: Download and install GitHub Desktop
Go to the homepage for GitHub Desktop
Download and install the appropriate version
Linux users can easily download GitFiend
Step 4: Cloning
Cloning means downloading your online Git repository to your computer
Unlike forking it doesn’t disassociate anyone
It also establishes a connection between your local and online files
Step 4a: How to start cloning from GitHub Desktop
in GitHub Desktop on a Mac
GitHub Desktop > Settings > AccountsSign in using your credentials to GitHub.com (not GitHub Enterprise)
File > Clone repositorychoose psychopy
(In GitFiend, you don’t sign in. You just provide the repository URL, which can be found in the GitHub repository under the
<> Codebutton, where you then choose theLocaltab, then thehttpslink)
Step 4b: How to finish cloning
psychopy should be listed because it’s already forked in your online account
under
Local Pathat the bottom, choose a logical place on your computer for the cloned repository (e.g., not your desktop)click
CloneThis might take a minute, depending on your connection speed
The result of cloning
full, updated* copy on your local computer of all the files from current release of PsychoPy®
including all the currently available localization folders
though you may need to add a new one (more on this soon)
Fully connected to your online fork of the repository on GitHub
* It’s updated at the moment you clone it, but as soon as someone else gets their commit(s) pulled in upstream, both your fork and its clone will be out of date. But there’s a way to deal with this (which is really the raison d’être of Git). I will cover this quite soon below.
Nomenclature after forking and cloning
origin
your fork of the original repository on GitHub
for your account, this is as follows
[your-github-account-name]/psychopye.g.,
johndoe/psychopy
upstream
the original repository on GitHub
always as follows for PsychoPy®
psychopy/psychopy
What does all this mean?
You have established the means to do the following:
add translations to PsychoPy on your own computer
push those changes to origin (i.e., your fork on GitHub)
then “suggest”* those changes to upstream (the original psychopy repo) through a pull request from origin
* You can’t push to upstream. Origin belongs to you. Upstream does not.
You’re done setting up Git and GitHub
… but… what about the -flow in workflow?
The next section is about keeping your repository up to date
Step 5: Continual Git workflow
synchronize frequently with the upstream repository
any time you begin work, occasionally while you’re working, and when you’re done
helps you avoid merge conflicts
usually, when 2 different contributors change the same lines of code in different ways*
e.g., if 2 translators translate the same string
minor headaches to fix by maintainers
but better to avoid them altogether
* … but can also happen if you change the same line on different branches
5a: Sync (from upstream) to origin
Go to your fork online
(again, this is your copy of the psychopy repository on GitHub, aka origin)
Make sure you’re on the release branch
(The pull-down menu at the upper-left shouldn’t say
dev, but ratherrelease. Use that same pull-down menu to choosereleaseif you have to)
Click:
Sync fork(located a bit to the right)*
* Note that this can only do something if there is, indeed, something new to synchronize from upstream
5b: Pull from origin
Go back to GitHub Desktop on your local machine
Make sure you are on the release branch
Repository > PullThis updates your local copy (your clone) with your fork (origin), which was just synchronized with the upstream repository
Now all three should be identical
Complete this step after the one before it, each time before you begin work on a new set of translations
The reason is that other translators on your team may have changed things since you last did, making your copy out of date
5c: A faster approach (no need to go online)
Branch > Merge into current branchYou will be given a choice of repos and branches, but DO NOT GO WITH THE DEFAULT*
Instead, choose
upstream/release- (it might help to typereleaseinto the Filter box)Click the tab at the upper right, which should Push origin along with an arrow and a number (the number of commits that it’s pushing to origin)
* Currently, the default is upstream/dev for some reason. We don’t know how to change this in GitHub Desktop for the moment. Choosing that would merge the upstream dev branch into your local release branch, a disastrous merge.
5d: AVOID one method in GitHub Desktop
Do not choose the following
Branch > Update from upstream/master
This would have the same disastrous effect as choosing the default (
upstream/dev) in the previous slide
Step 6: Continual Git workflow
Yes, this slide is repeated
Why?
to emphasize that keeping one’s repository up to date is a common routine
not something that you do once and forget about
or only do occasionally
On to Working on translations