
When we make an experiment in PsychoPy builder, it is writing our experiment in Python code under the hood. Now it also writes our experiment to JavaScript via PsychoPy’s sister library PsychoJS.
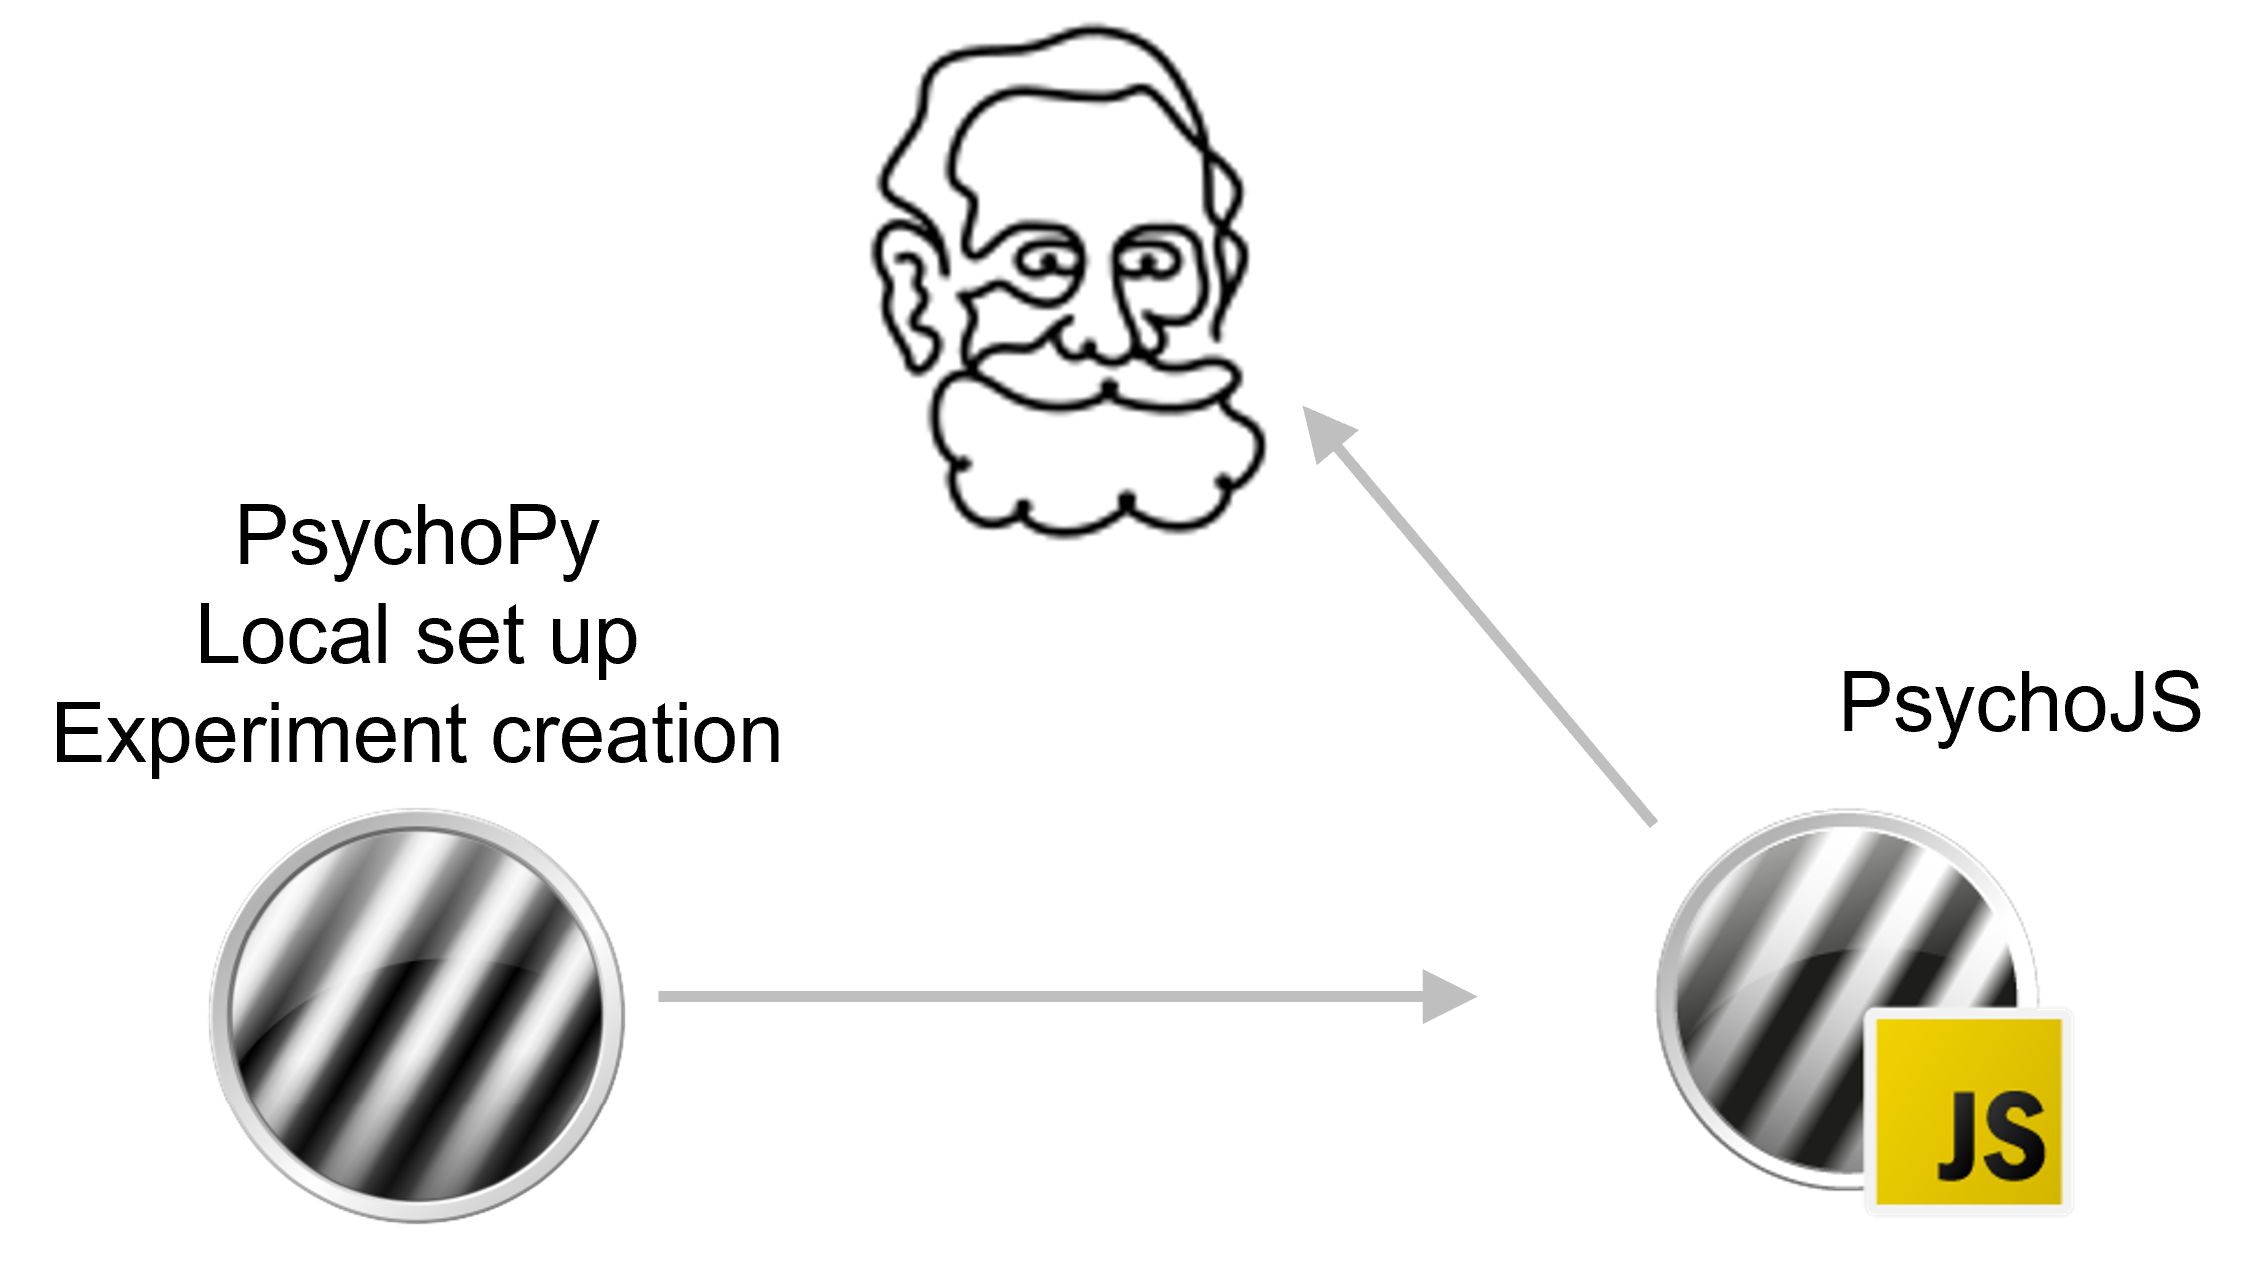
If you prefer to write experiments in pure code, you can use Javascript using PsychoJS.
But, in general it will be faster, less bug prone and easier to share with non-coders if you use Builder.
Once we have our experiment written in JS, we need a way to “host” it online. Pavlovia is:
A secure server for running experiments and storing data.
A git based version control system.
A huge open access library of experiments (that you can add to!)
A place for creating and running Surveys (using Pavlovia Surveys)
We have a unique model to try and sustain open source software, whilst trying to be as low cost as possible.
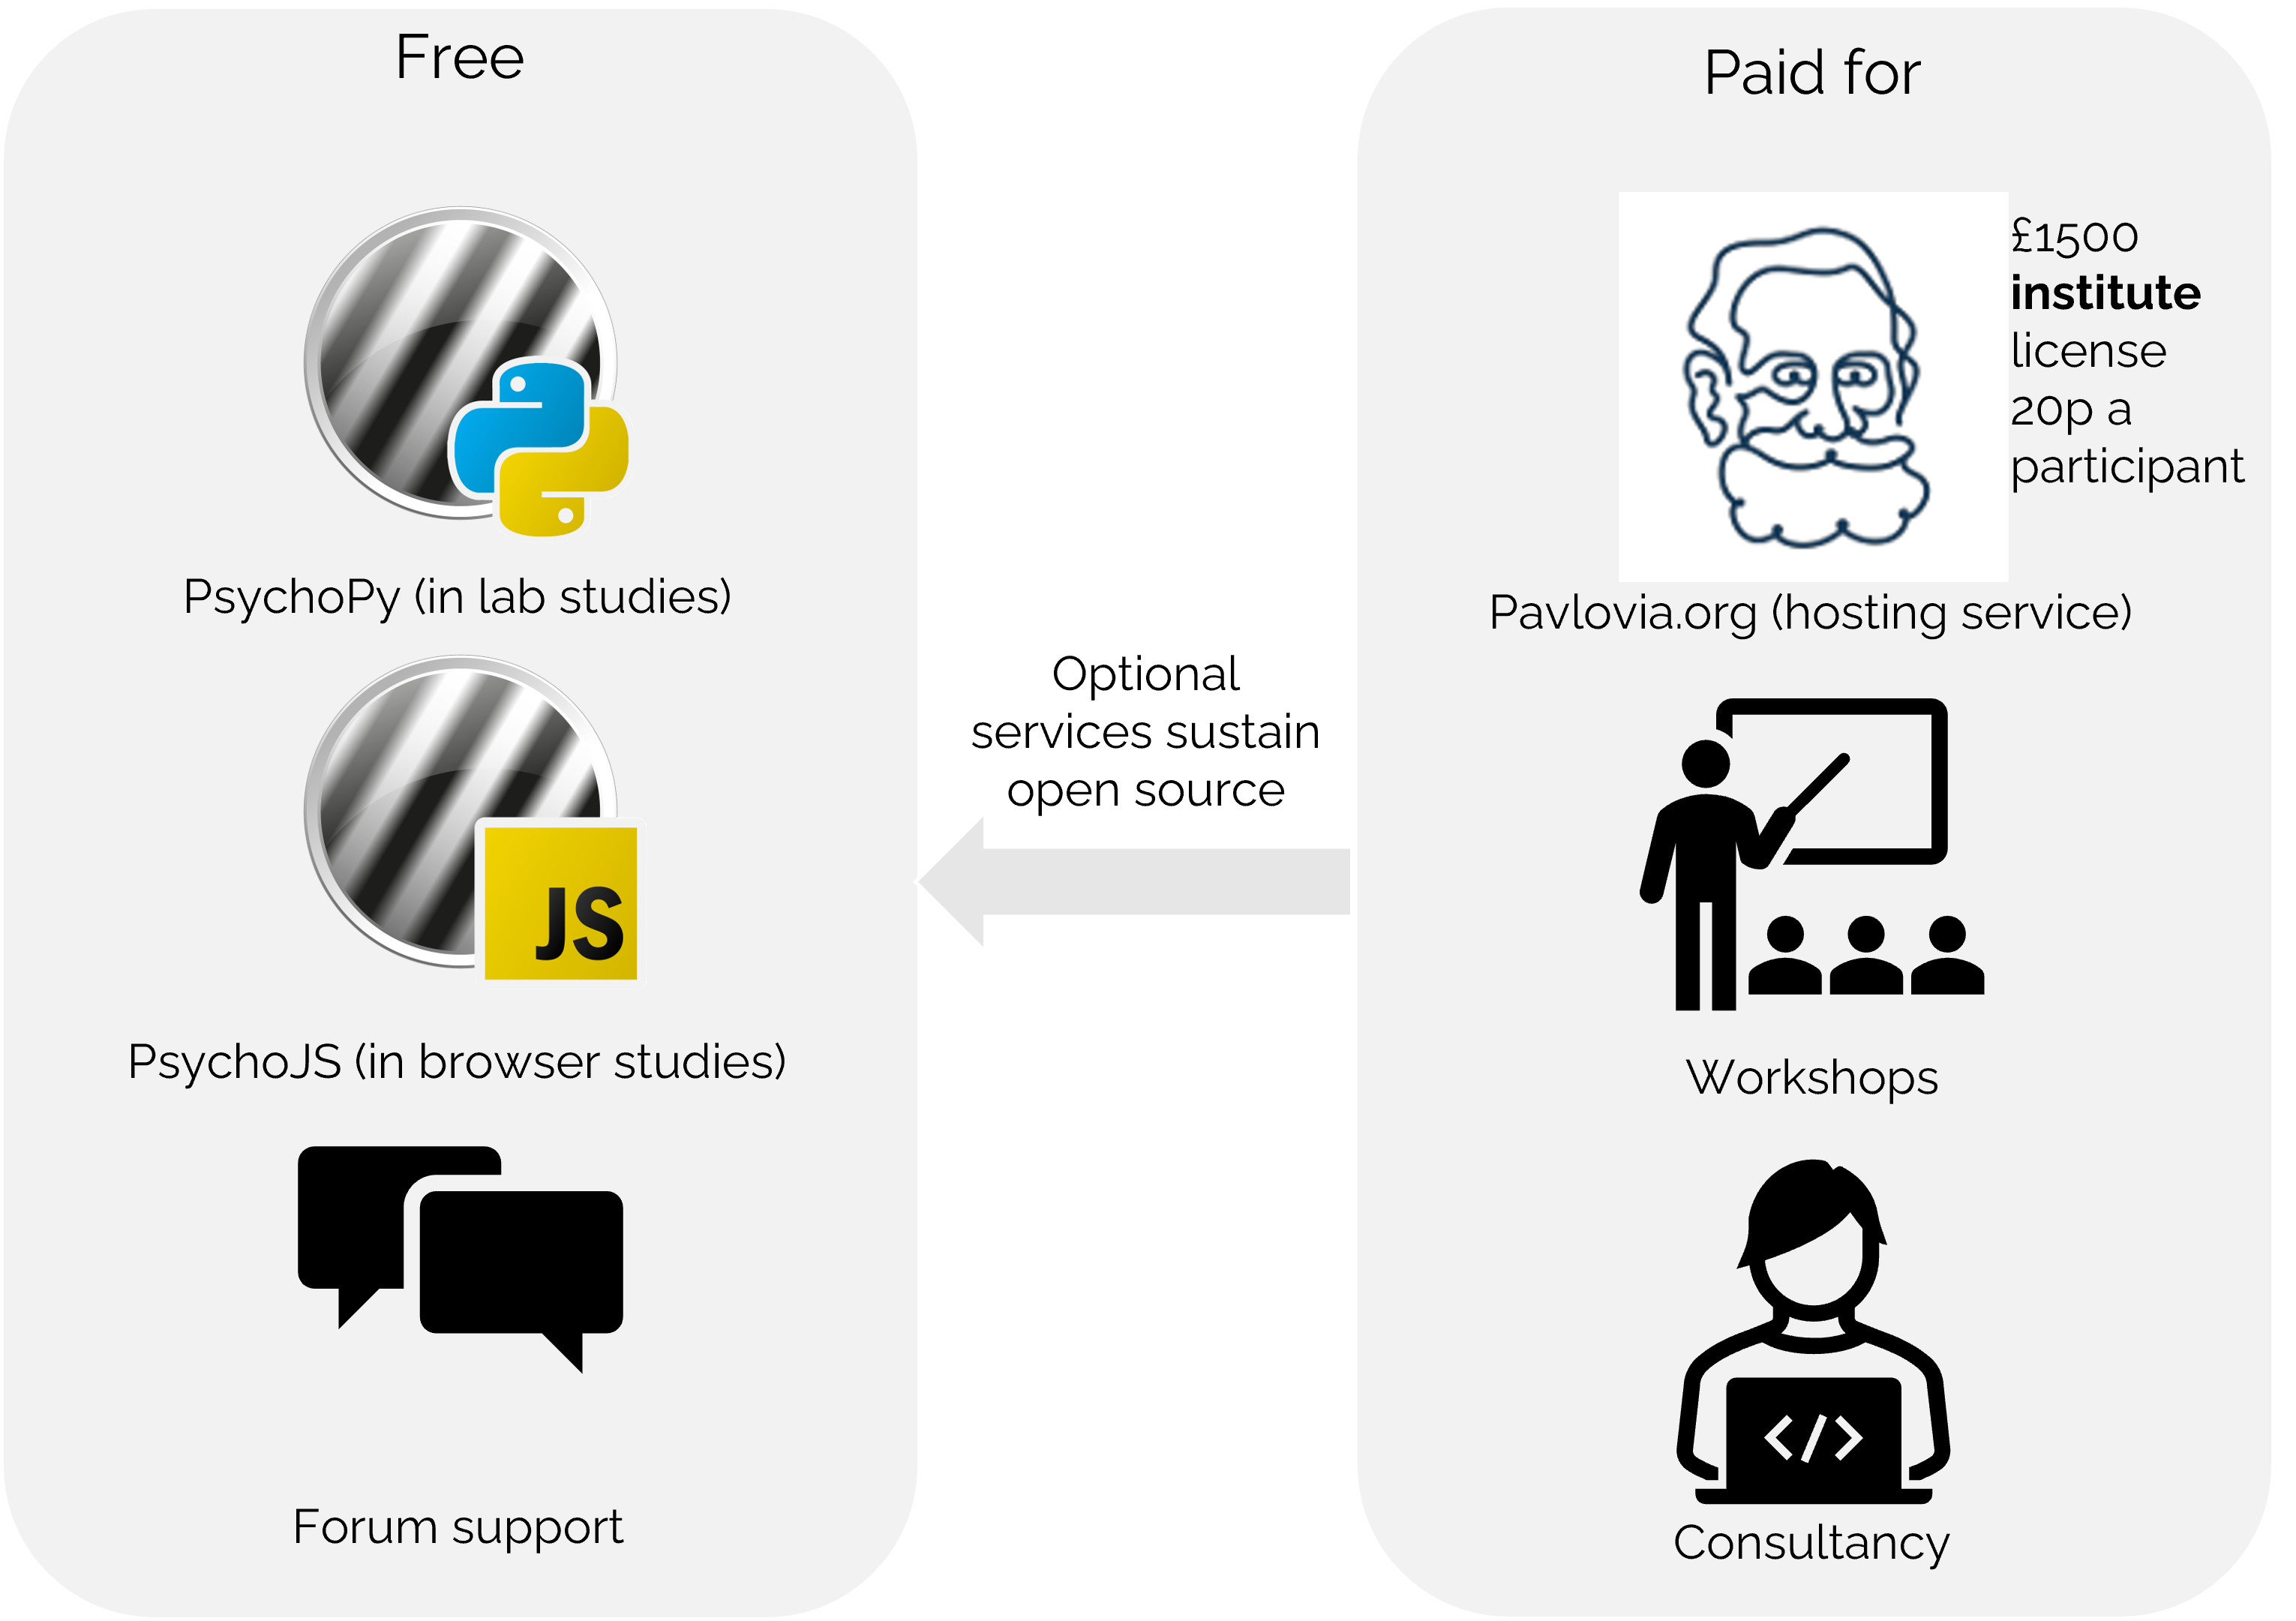
Fig. 4 As of Jan 2023 Licences will be £1800/£0.24 credit (£900 for emerging economies)
We might want to use Pavlovia.org to:
Find and reuse others studies
Launch our own study in browser
Build surveys
There are two ways we can find and use existing experiments from Pavlovia:
From within pavlovia itself using the explore tab.
From within PsychoPy itself using the search globe.
We could directly download an experiment on pavlovia.
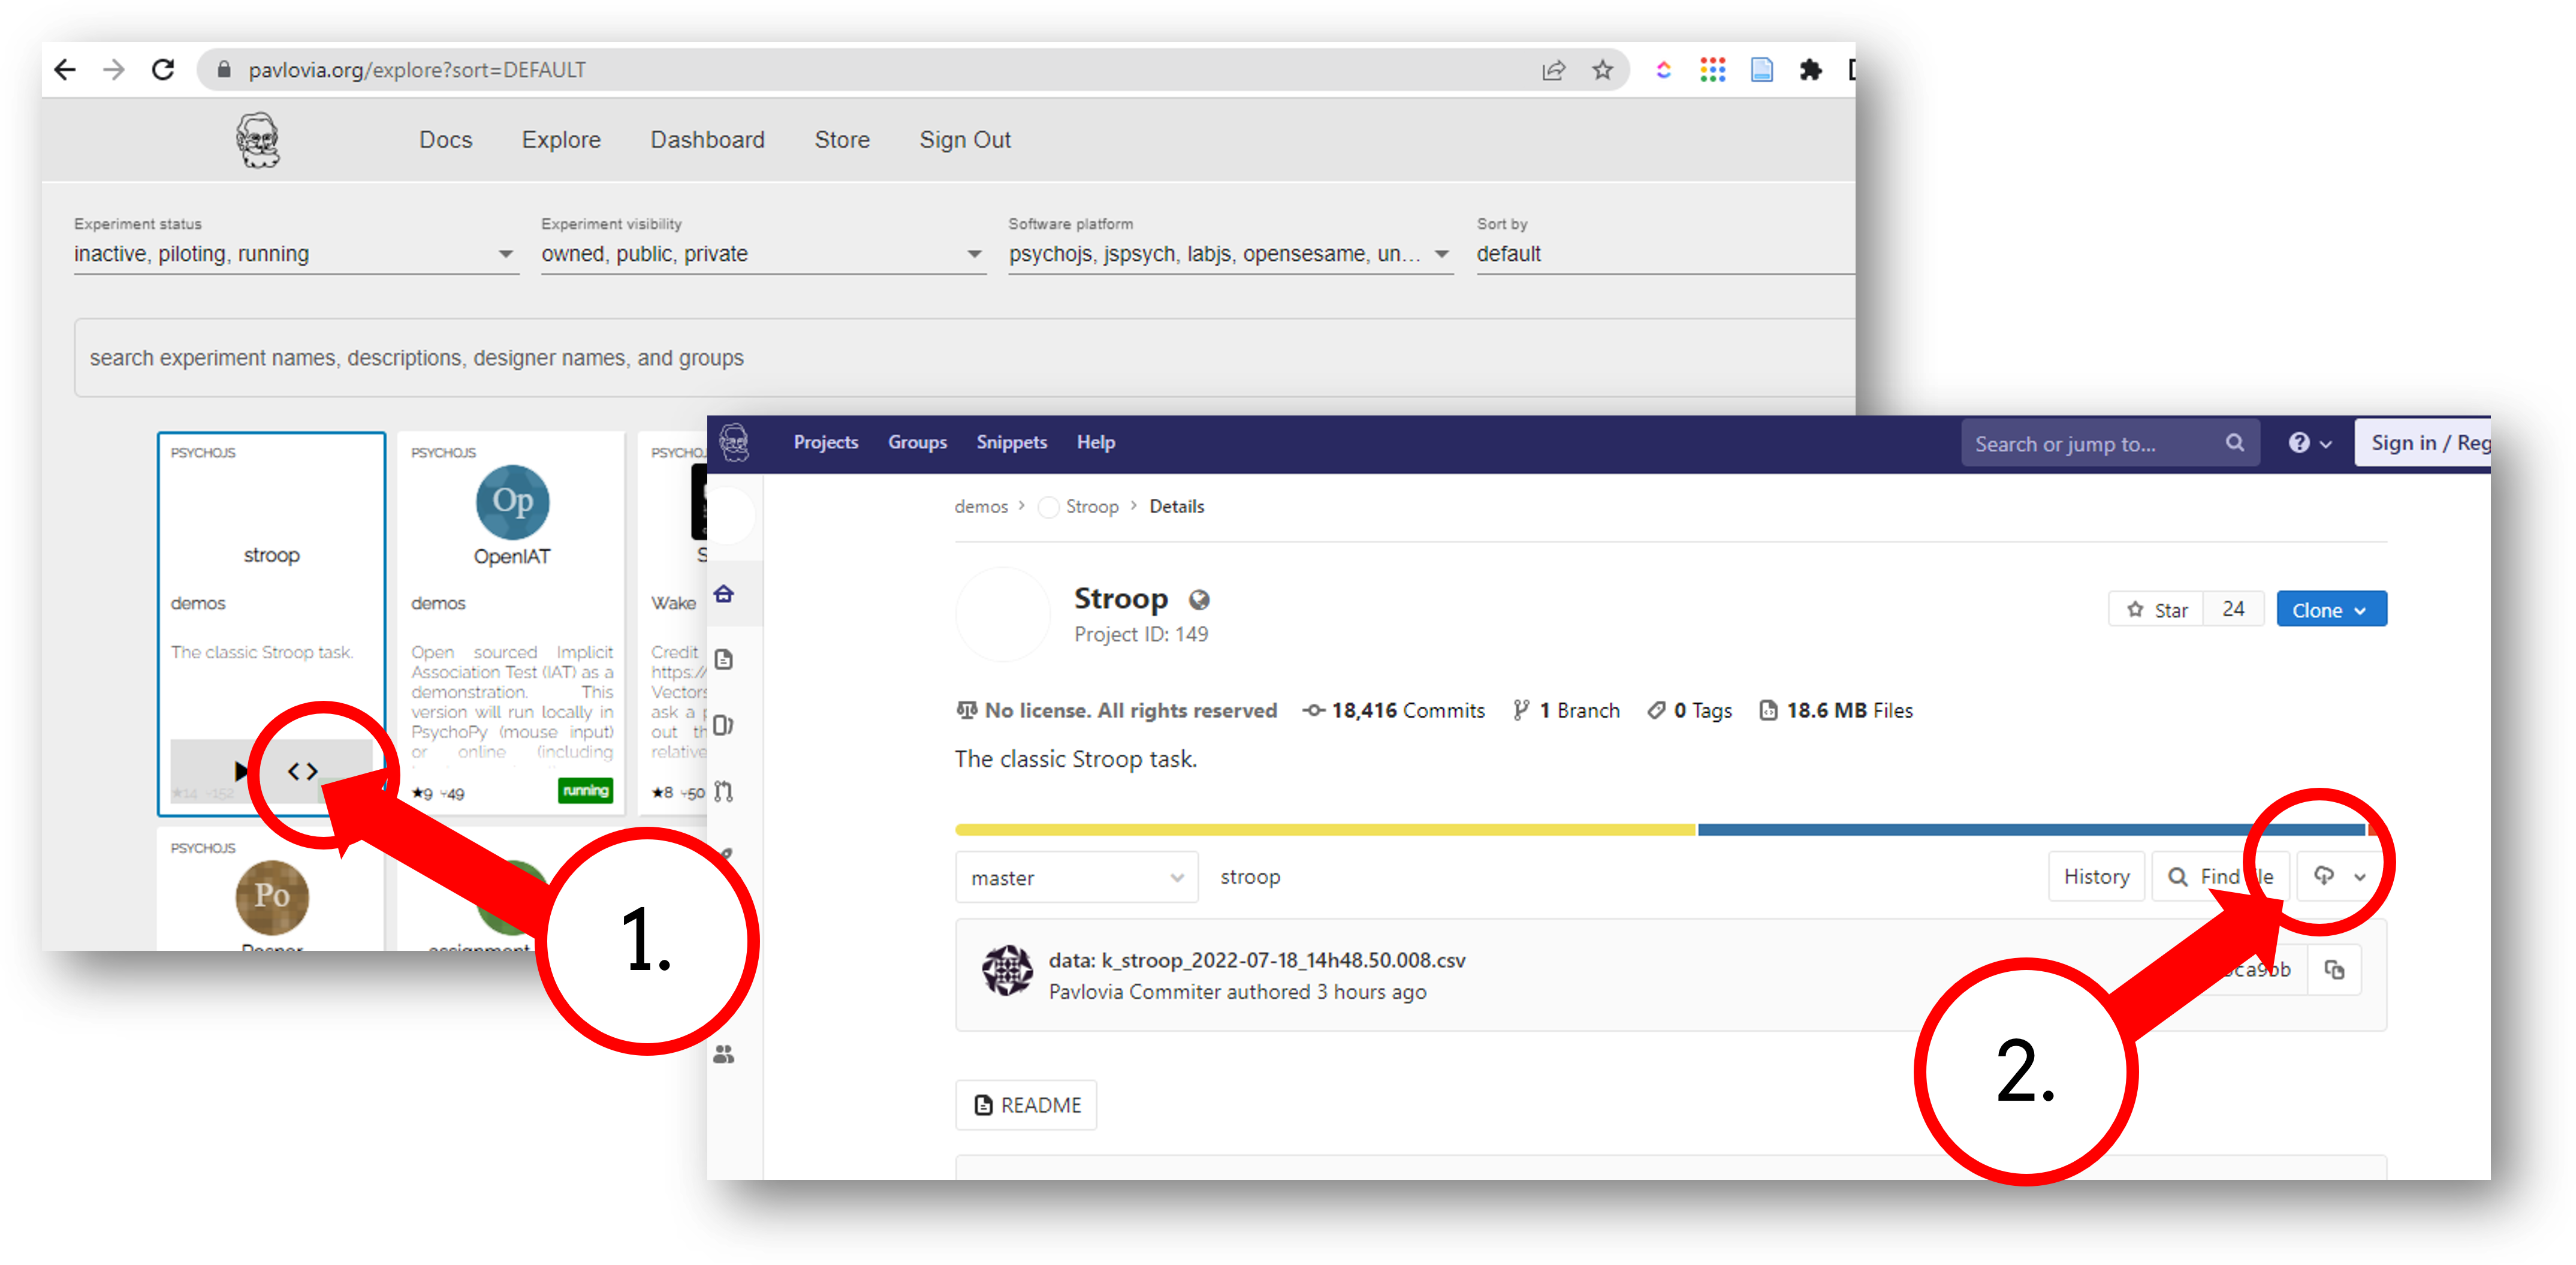
Or we could search for that experiment and download it directly in PsychoPy:

If the task that you need doesn’t already exist - upload your own! Before you get started try to make sure you:
Have a fresh folder that contains only one .psyexp file and the resources needed by that file.
Check your folder is not in a location already under git version control (if you’re not sure, you can show hidden files, if your folder or any folder above it in the path has a .git file - that area ia under version control).
Once you have made your experiment and made sure that your local folders are organized neatly ( with one .psyexp file in this location) you’re ready to sync your project to pavlovia!.

Once you have synced your study you will find it in your Dashboard on pavlovia.org under “Experiments”.
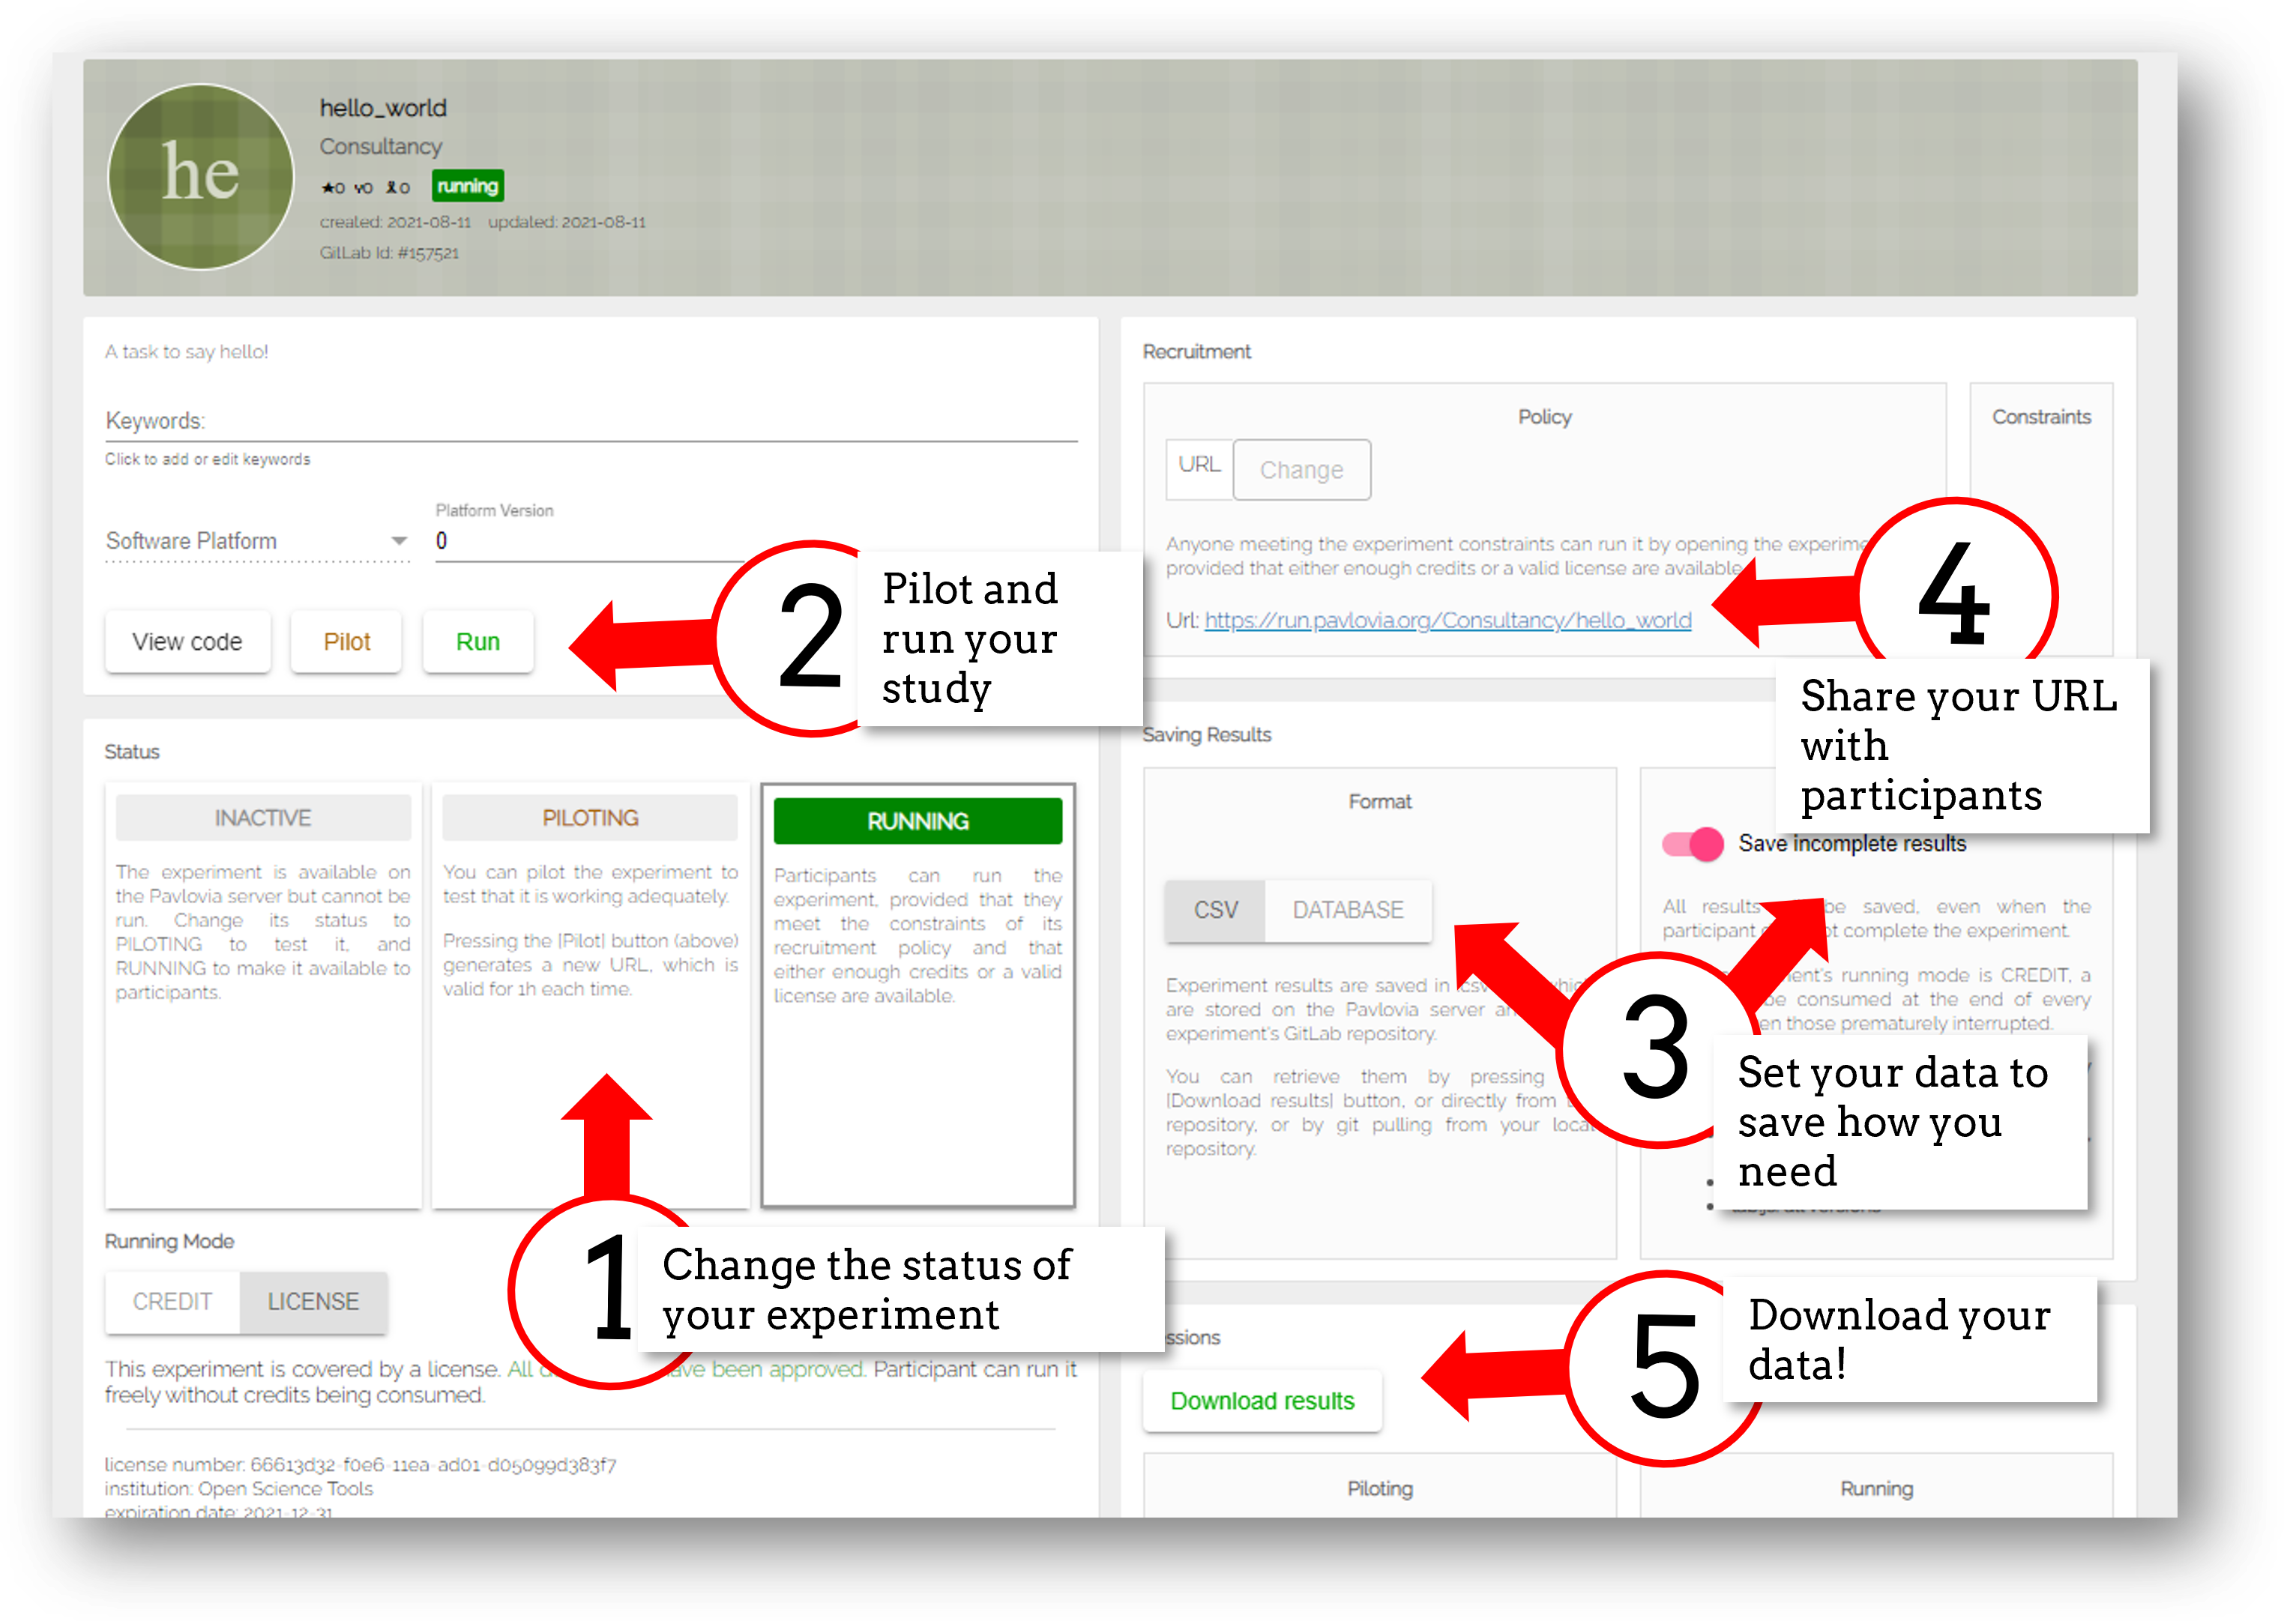
Piloting versus running:
Piloting will produce a token that lets you run your study for free for one hour, a data file will automatically download so that you can inspect it.
Running will generate a URL to share with participants - no data will be downloaded locally using that link.
CSV or DATABASE:
CSV will generate a csv file per participant that will be sent to your gitlab repository (so it will be public if you make the repo public).
DATABASE will append all participants data to a single file (it will not be sent to gitlab).
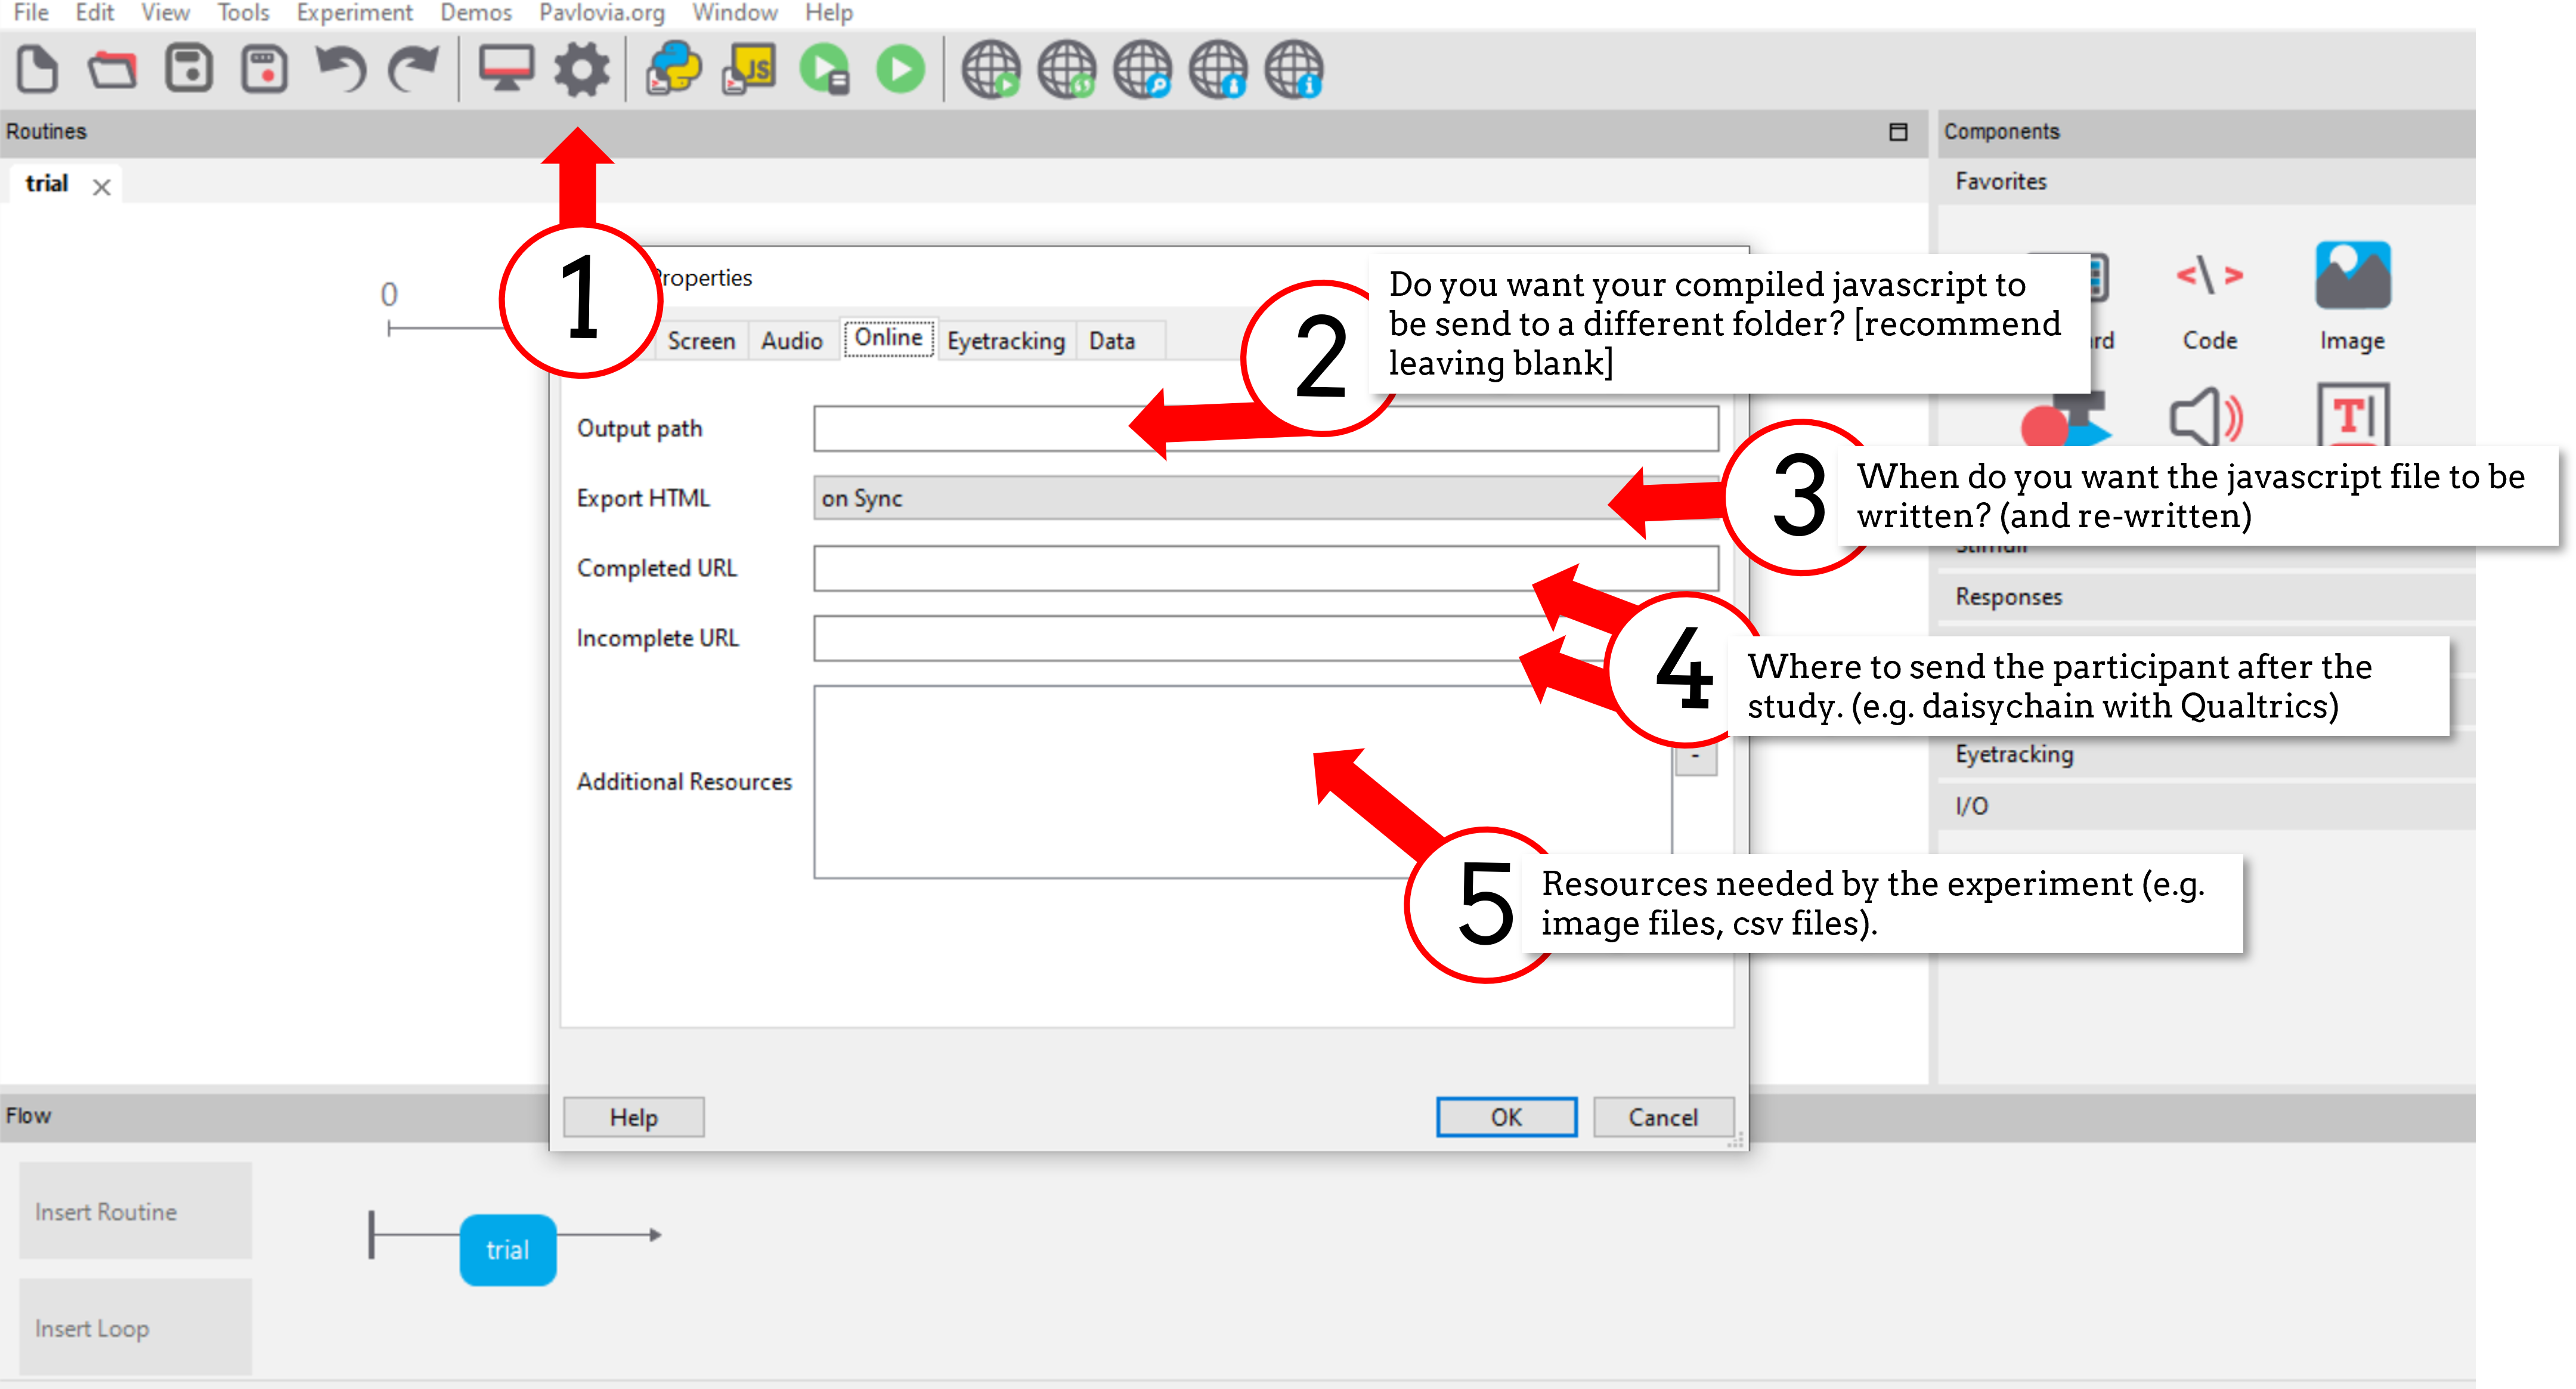
Inside the experiment settings of PsychoPy you can configure the online settings of your experiment.
Let’s quickly make a basic experiment and put it online:
Make a new .psyexp file with some text that simply reads “Hello, I’m online!”
Sync that experiment to pavlovia.org
Go to your experiment dashboard to find your experiment
Change your study to piloting and check that it runs by changing it to pilot mode and select “pilot”.
Redirect your participant to PsychoPy.org when they have completed the task, redirect them to pavlovia.org if they do not complete the task.
Let’s try putting the task we made in day 1 online and getting some data together!
Use the most recent release developement is happening so much faster now!
Check if the components you want to use are supported online.
Specify the resources needed for your experiment.
Use height units as they will scale across devices.
Headphone checkers - Can be easily added thanks to Milne et al 2020
Viewing distance checks - Using easy eyes
Participants can use any device (mobile phones, tablets, laptops…).
You can check the window size at anypoint using win.size()
Pavlovia will automatically try to save frame rate and OS (but be careful, browser security can “fake” OS)
You can make experiments touchscreen compatible using the Mouse component…
Mouse responses register as touch responses on touch screen devices, so they do make for a more portable online study.
In our example, we can allow participants to click on numbers by making the mouse end and save data on “valid clicks”, this returns:
mouse.time the time(s) of the mouse click(s).
mouse.clicked_name the name(s) of the last object clicked
Accuracy feedback from a mouse
Imagine we wanted to check our participant had selected the correct object. We could add a column to our conditions file e.g. “corrClick” then use a code component to check if this was correct:
if mouse.clicked_name[-1] == corrClick:
    correct = 1
    print('correct!')
else:
    correct = 0
    print('incorrect')
Note that we use [-1] to retrieve the last object/time that was clicked.
Make the rest of your experiment touchscreen compatible. You will need to add mouse responses that can be used instead of/alongside keyboard responses. Remember:
If it doesn’t matter what the response is “any click” is fine
If it does matter what the response it (e.g. a consent page) You’ll need to add some Text, and list it as “Clickable”.
There are some neat aspects to the mouse that can make for interesting interactive experiments.
Most stimuli (except for text) have a method .contains() and so we can test whether the mouse is at that location.
Let’s create a circle called myStim and an object that tracks the mouse, called marker and make marker change color if it goes inside the circle.
All we need is a Code Component with “Each Frame” set to:
if myStim.contains(mouse):
  marker.color = 'red'
else:
  marker.color = 'blue'
Note
To take this online we need a slight edit:
polygon.fillColor = new util.Color("red");
instead of:
polygon.color = 'red'
The stimulus that you test can be moving and that’s fine too. The .contains() method doesn’t care if the position is changing!
The “stimulus” can also be invisible (so you’re effectively just using it to define an “area” rather than a stimulus).
It’s very easy to make a stimulus appear at the location of the mouse:
add a Mouse Component (let’s call it mouse)
set the position of your stimulus to be at mouse.getPos() and update on every frame
You can track the mouse by setting data to save on “every frame”.
You can continuously check if a mouse is pressed in an object using mouse.isPressedIn(x) method.
If dragging one thing, you set the position of something to be the location of the mouse if it’s pressed in that object.
If dragging more things, there are more considerations. Here is a demo and experiment files.
For a more advanced drag and drop demo see here
So your task was running perfectly offline, then you pushed it online, and it doesn’t work - why? There are lot’s of reasons something might not work online, but the most common errors are coding errors.
Remember that locally PsychoPy runs a compiled python experiment. Online pavlovia runs your compiled JavaScript experiment which uses the PsychoJS library.
Not everything in Python will transpile smoothly to JS, why?
Online experiments only have access to what our browser has available, not all resouces on your desktop.
Are you trying to use a Python Library? Browsers need JavaScript.
PsychoJS is younger than PsychoPy! (but we’re making good progress!)
When we add code components we have the choice to add code as either:
Py - pure Python
JS - pure JavaScript
Both - Python and Javascript independently
Auto -> JS - automatically transpile python code to javascript.
The last option is very cool and useful - but it can catch people out if something doesn’t translate smoothly!
Update to the latest release! Version 2021.2. improved transpiling alot and you can save alot of manual debugging online using that version.
Always check the status of online options (you can filter your components in the PsychoPy app to show what works online)
Push your experiment little and often (don’t make your full experiment perfectly locally and then try to push it online)
Read the crib sheet
Check out the psychoJS documentation
The forum is always there!
There are several kinds of error we might encounter when getting online, but generally these fall in three categories (you can find a useful tutorial here)
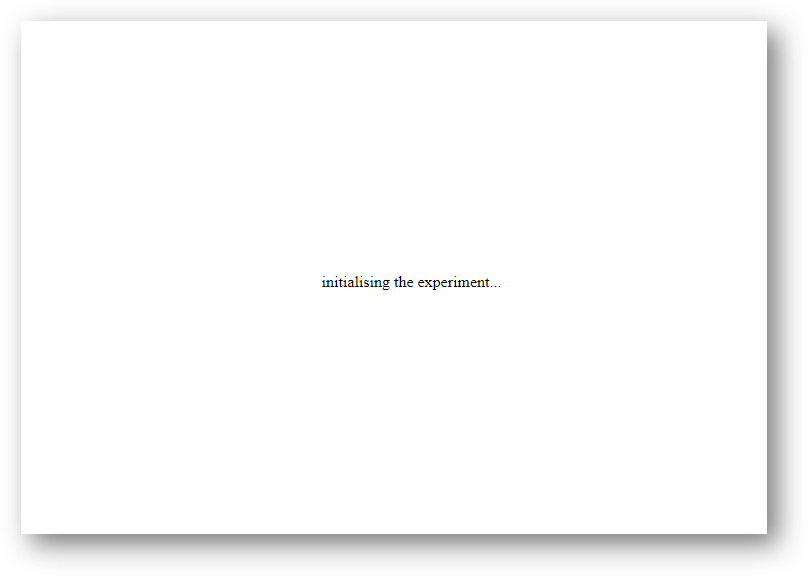
The experiment is stuck on an “initializing experiment” screen. This usually means that there is some invalid Javascript written - so the experiment code cannot run at all. For this we need to explore the Developers console
“ReferenceError: X is not defined”
This means that you are referencing a variable that is not yet defined in your Javascript. There are several reasons this could occur…
Using python modules
Semantic errors commonly happen when researchers try to use python libraries or functions that don’t exist in Javascript e.g. “np is not defined” We recommend taking a look at the crib sheet in cases like this that need manually translating. Here, there is a handy list of python terms and there equivalent JavaScript term (A huge credit to Wakefield Morys-Carter for compiling this).
Generally PsychoPy will try to find all the resources you need automatically and load them, but there are some cases this might not work..
Incorrect file extension
Your image is a “.jpeg” but you have accidentally used the extension “.png”
Resources defined through code
If a resource is defined through code rather than from a conditions file or component field then PsychoPy can fail to “prepare” for the eventuality that resource is needed. In cases like this it is always a good idea to manually add any additional resources you might need to the additional resources section of the experiment settings when Configuring online settings.
A type error occurs when we use the wrong type of variable in order to do something. In this case we try to use something to “construct” an object when this variable cannot be used in this way.
This can also occur because something exists in PsychoPy that does not exist in PsychoJS. For example core.Clock() is not a constructor in JS because Clock lives in the util module of PsychoJS i.e. util.Clock(). The crib sheet can be helpful in helping in these cases.
Let’s find out…
This is the equivalent to your “StdOut” window in runner view. In fact, it’s alot more than that - it’s a shell where you can type and try out bits of JavaScript. You can access developer tools in most browsers by right clicking the browser and selecting “inspect” then clicking console.
For faster access look up the keyboard shortcut for your specific operating system/browser!
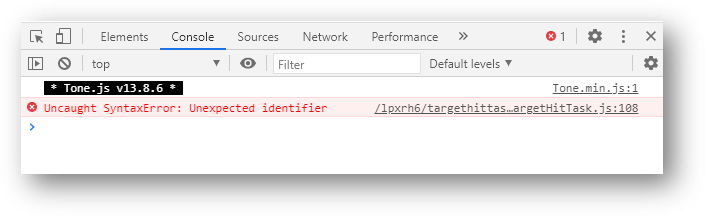
The developer tools are particularly helpful for Syntax errors: Initializing experiment, where there is no error message, but things “don’t work”.
You can open developer tools in your browser (the crib sheet) gives tips how to do this on different browsers/operating systems) This will tell us where our (which line) error is occurring. Remember, exporting to code is a one-way street. So whilst it is useful to look into the code, we really recommend fixing errors back in builder where possible.
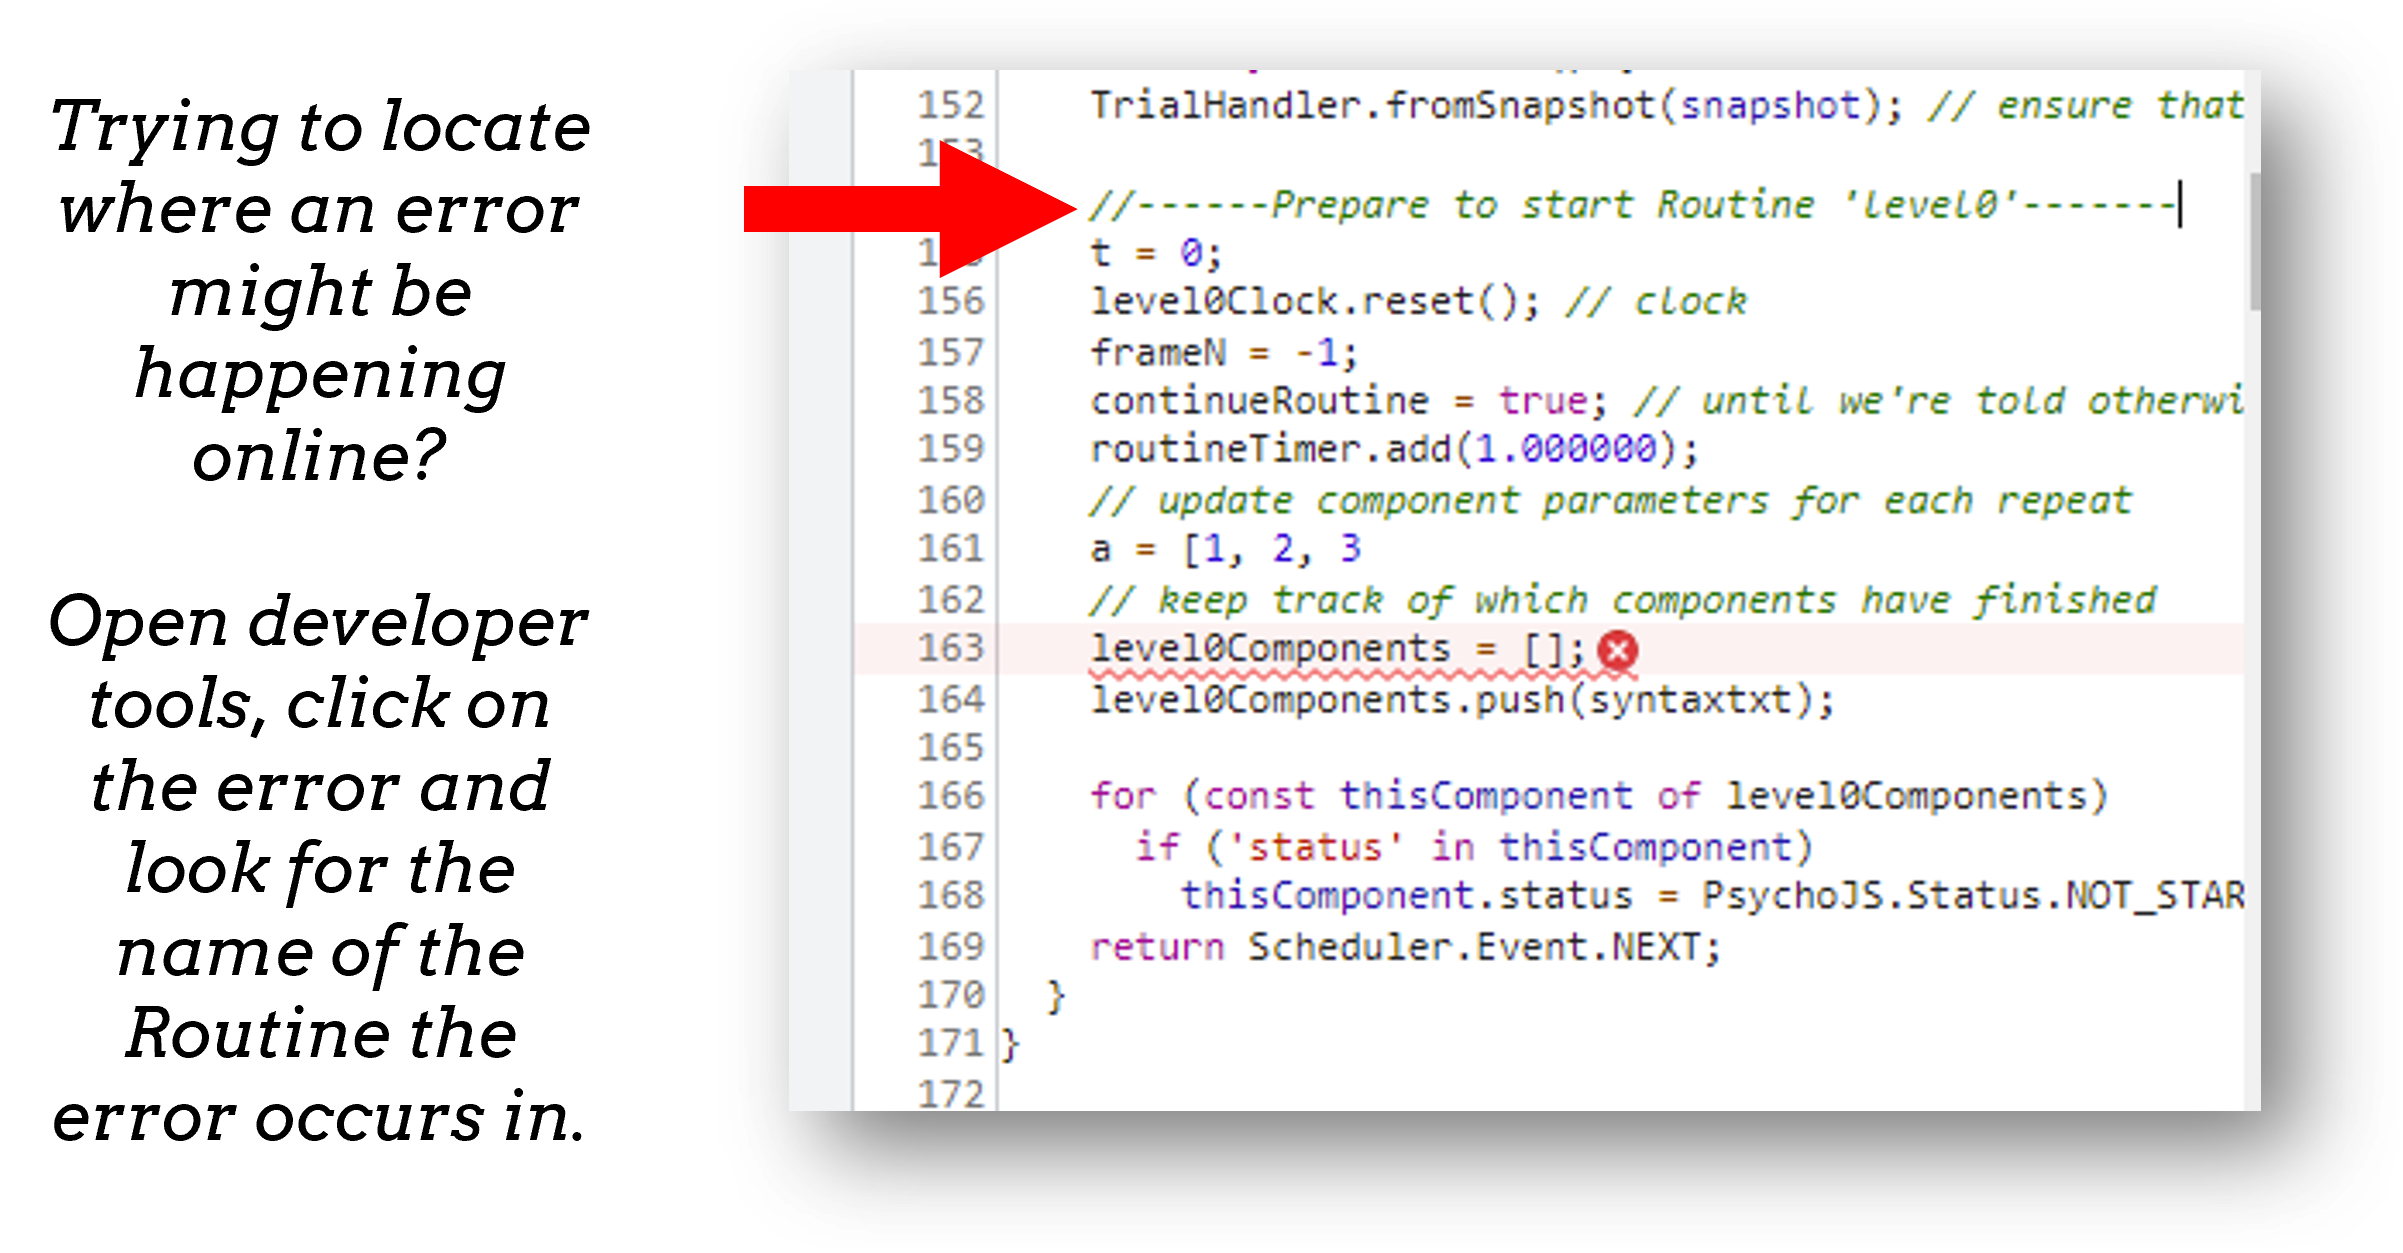
If you are ever unsure where to look in your builder experiment for an error, you can look for the line that indicates what routine this code is being executed in.
If you ever make a change in your experiment and it isn’t reflected in your online experiment, it is very likely you need to clear your browser cache. How this is done can vary browser to browser - so do search how to do that on your specific operating system/browser.
Think Escape room, but with bugs…
I am going to give you an experiment with 4 levels, each level contains a bug. Use the skills that we have learnt to find each bug and progress to the next level.
To start fork or download this experiment.

console.log(): The equivalent of print() in python. Useful for when a variable doesn’t appear as you expect - you can print out values to your console and check they are updating as you expect.
window.object = object: pass an object to the window for inspection e.g. pass a component by replacing object with the name of your component. Useful for seeing what attributes and methods an object has.
window.open('myURL'): open a new window e.g. a questionnaire (note: can be blocked as a pop up by some mac users).
alert() Add a pop-up alert to the participant.
prompt('Please enter your name', 'default') retrieve some info from the participant via a pop-up
confirm('Please click OK!') Display a pop-up box with OK or cancel.
Note
If you are running your study in full screen mode these will break into window mode*
Remember that you can always export your experiment to it’s underlying JavaScript code as well, this can be useful in learning how some things are defined differently in PsychoPy versus PsychoJS, and finding variables that will exist “under the hood of your experiment. For example expInfo['OS'] and expInfo['frameRate'] might be useful for checking the participants Operating system or screen refresh rate.
Note
Remember that this is a one-way street! don’t be tempted to alter the JS code if you want to continue making edits in builder! implement code from within builder itself!*
Pavlovia uses a powerful git-based system for storage and version control. Some of the benefits of using this include:
Fork existing projects
Version control
Easy sharing of your task (open science)
Add lab members to projects
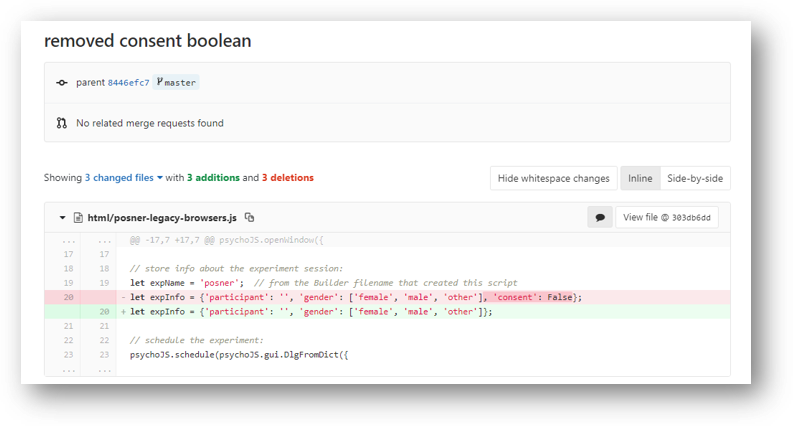
Pavlovia uses a git based system for version control called “gitlab”. You can see when the last changes were made to the task by looking at the commit history.
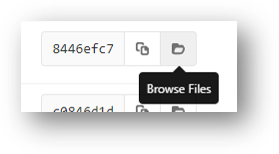
If you click on the change you can see deletions and insertions. You can browse the repository at that point in history to retrieve past files!
To add members to your own project, you can use the settings>members option where you can search and invite collaborators.
You can change the visibility of your task at any time under permissions. Remember Once you make your project “public” the data file stored there will also be public (unless you have your data saving mode set to database).
When we take a study online, it is often important to automate group assignment in some way. At the moment, Pavlovia does not have an “out-of-box” solution for this - but there are several ways to approach this.
Quite often, researchers think that if they have several groups they will need several Pavlovia projects (one per group). This is often inefficient and can become quite confusing when collating the data. Instead, we can make a single experiment and start by using the principles we learned in Block designs and counterbalancing.
When sharing a study with a participant, we can auto-complete fields in the startup GUI using query strings. You can provide info to your experiment by appending your experiment URL with ?participant=1&group=A - where “participant” and “group” correspond to parameter names.
There is no limit on the number of parameter names that you provide, so long as each parameter is separated by an ampersand (&)
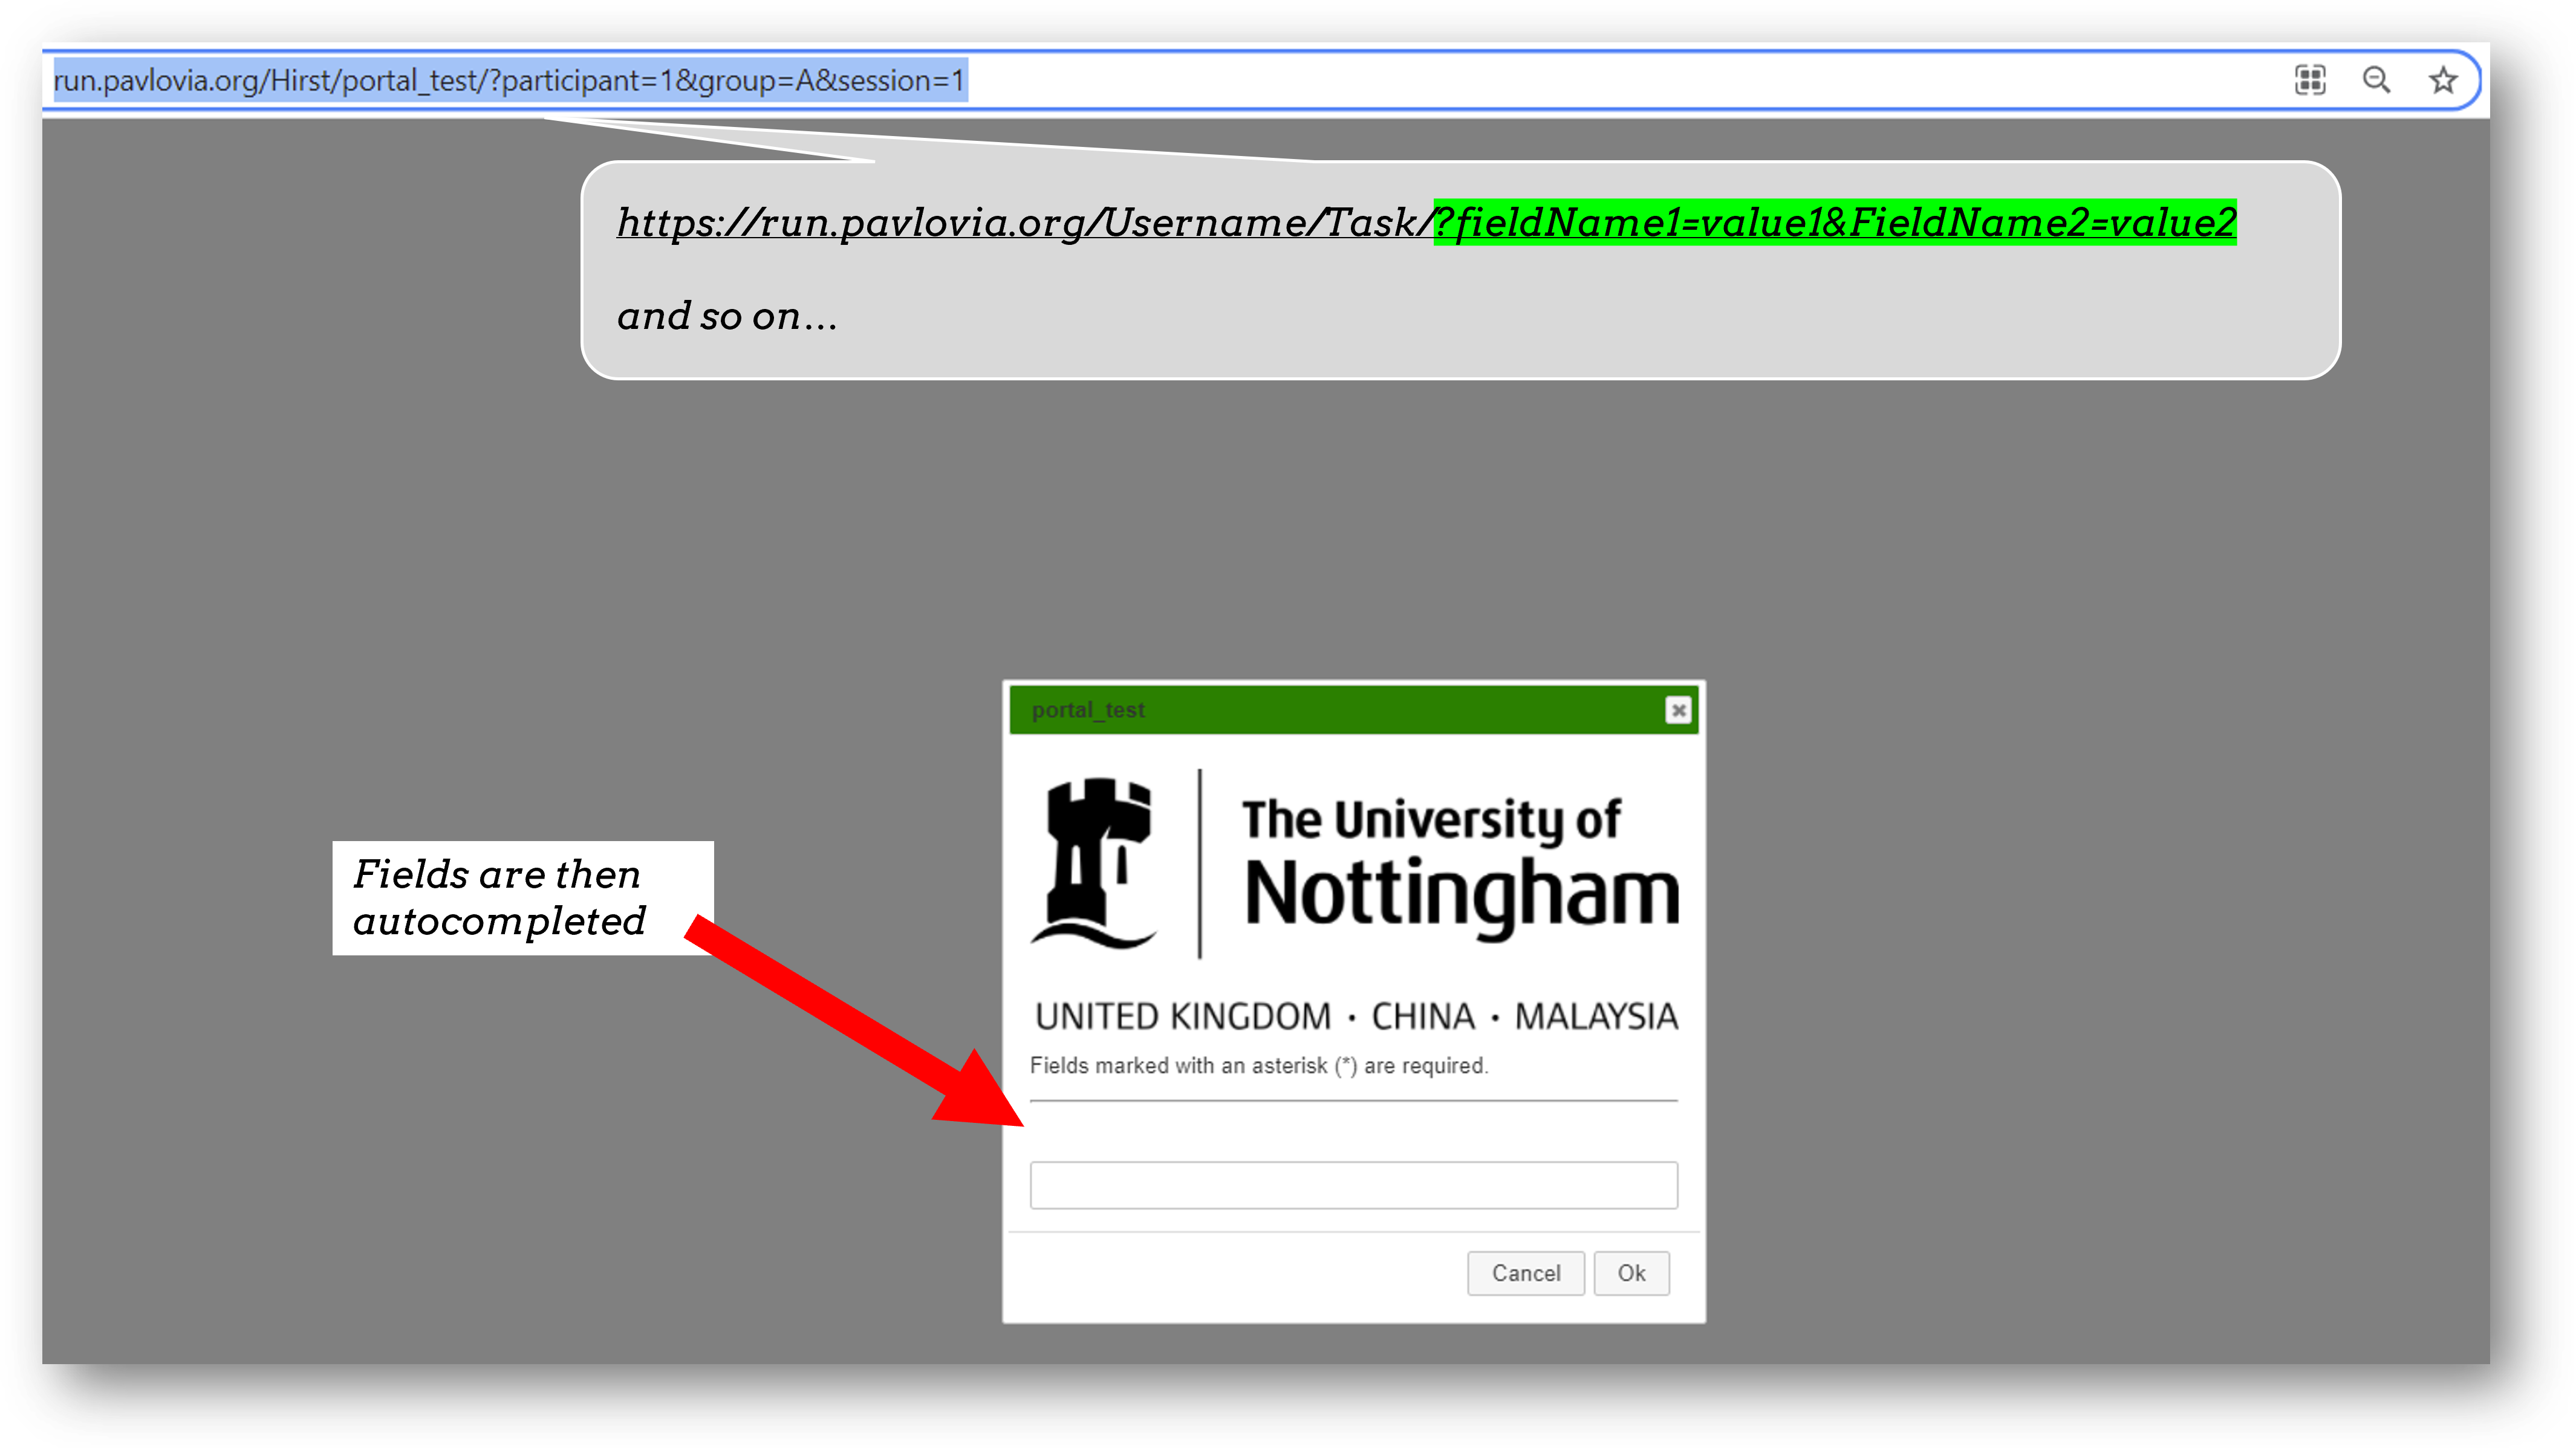
Thanks to query strings we can generate several URLs for the same project but for each group. For example, you might have 4 groups and therefore share the URLs:
Warning
If you are using this approach and sharing URLs on recruitment websites, be careful that the same participants do not complete several URLs.
The Shelf is a newer feature of Pavlovia.org it allows “persistent storage” of information so that a variable can be accessed and updated by the same experiment several times, or accessed and updated by several experiments.
As the Shelf is a newer feature, you do need to interact with it via code, you can find a set of examples how to do this here.
Let’s practice debugging errors, then play with advanced plugins we can use online ( Advanced online).
Then we will try Coding a full experiment.