
As with all things involving programming, there are many ways in which we can achieve the same goal. In this tutorial we will cover how to make an n-back task and we will talk through how we could achieve this in a few different ways.
So, what makes an n-back?
Stimuli (typically letters or numbers) presented on every trial
On a proportion of trials the stimulus will be the same as the nth back
Participants press a key to identify if this stimulus is the same as the n-th back
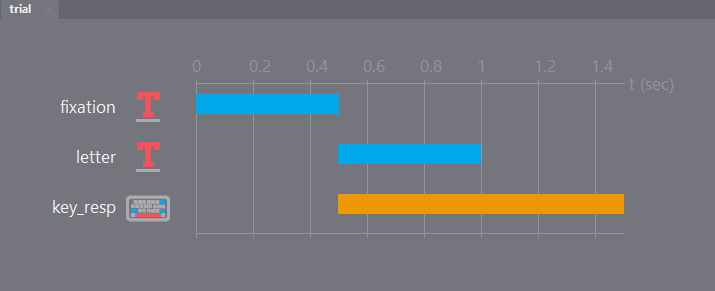
In it’s simplest form, our experiment consists of 3 components, a fixation cross to start the trial, a text component to present our letter and a keyboard component to gather responses. You can see that here we have set the start and duration parameters of each component such that the fixation is presented for 0.5 seconds, followed by a letter for 0.5 seconds. The participant can start responding as soon as the letter is presented, they can also respond for 0.5 seconds after it has been presented.
One of the first things to think about when making any experiment is what changes trial-by-trial. In this case it will be our letters as well as whether that letter is a “target” (i.e. the same as the nth back). Let’s make a spreadsheet and use the column target to indicate if this letter is the same as 2 back. (we probably also want a few more rows than this!)
thisLetter |
target |
|---|---|
L |
0 |
J |
0 |
A |
0 |
K |
0 |
A |
1 |
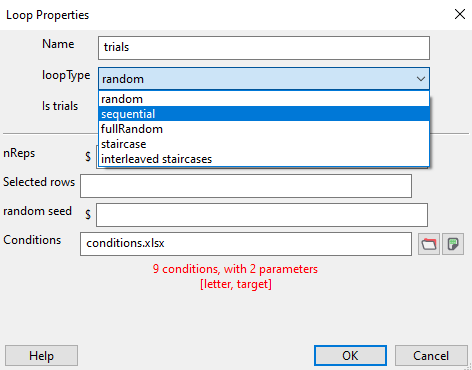
once we have our conditions file set up and saved in the same location as our experiment we need to give this info to our experiment. Add a loop around your trial routine and give the path to your conditions file in the Conditions field. We want to make sure our letters are presented in a preset order, so make sure to set loop type to sequential.

Finally, because our letter is changing trial-by-trial add $thisLetter to the text field of your letter component and make sure to set every repeat
There are a few tweaks we need to make to our keyboard component to make sure things are just right here. First, by default a keyboard response will force the end of the current routine. That means that if any stimuli were going to be presented later in the routine they would not be presented, in our case it would alter the inter-stimulus-interval by shortening this trial. So, make sure to uncheck the Force end of Routine box.
The final thing we might want to do is make sure that we store whether a keypress was correct or not. We can do this by adding a column to our conditions file to indicate what the correct response would be on that trial:
thisLetter |
target |
corrAns |
|---|---|---|
L |
0 |
|
J |
0 |
|
A |
0 |
|
K |
0 |
|
A |
1 |
space |
Under the Data tab in our keyboard component we then need to select the Store correct option and feed in our column header to the Correct answer field $corrAns
And there you have it! a very simple n-back task!
Add some instructions and a thanks message.
Turn this instead into a 1-back task.
Add a routine for participants to practice Hint: you can use the same routine several times in an experiment, which can really save work in the long run!
Counterbalancing your n-back
What if we don’t want a preset order? What if we want the selected letter to be truly random?
There is nothing special about the way that we counterbalance an n-back. The principle is the same as that covered in other counterbalancing tutorials. But the take home message is don’t double up routines with near identical content. In our case we might want one block where we test 1-back and another where we test 2-back.
To make our stimuli completely random in our n-back we need to know a bit of code. But we can still do this from the builder view, we just need to add a code component. The first thing we need is a list of numbers to select from, in python we could to that using string with string.ascii_uppercase.
Because we only have one list of letters, that will never change throughout the experiment, we can add this to the Begin Experiemnt tab of our code component:
import string

letters = list(string.ascii_uppercase)
Here we also use list() to convert the string generated into a list.
Note
Because string is a python library, that won’t work online. So instead you might want to make a basic list letters = ['A', 'B', 'C', D'...]
then on each trial, rather than using $thisLetter from the conditions file, we could make our own variable for this by randomly selecting from our list. Because this changes on each routine we would write this in the Begin Routine tab:
thisLetter = np.random.choice(letters)
But wait a second….
We don’t want the number to be random on every trial, instead we want it to be the same as the n-th back on some trials. So, we need a bit more code. First, let’s track the letters presented on each trial by adding them to a list. In the Begin Routine tab we make an empty list presentedLetters = [] then in the Begin Routine tab we add the presented letter to the list:
thisLetter = np.random.choice(letters)
presentedLetters.append(thisLetter)
Note
Because append is a specific python method, to add elements to lists for online tasks we instead use presentedLetters.push(thisLetter) where push() is the Javascript equivilent of append()
OK so we are tracking the letters, now we want to detect when a target trial occurs so that we can select the n-th back. We can keep using our conditions file for this, where target is specifed in the target column of our spreadsheet. We then update our code:
n = 2 # first specify the n condition of the trial/block
if not target:
        thisLetter = np.random.choice(letters)# if this is not a target then randomly choose
else:
        thisLetter = presentedLetters[-n]# if this was a target choose the n'th back
presentedLetters.append(thisLetter)
We are nearly there, the last thing to do it so ensure that our non-target trials stay non-target, that is, we don’t want the randomly chosen letter to be the same as the n-th back if it is a non-target trial! For this we can use a “while” loop:
n = 2 # first specify the n condition of the trial/block
letterSelected = False # a boolean to state a letter has not yet been selected
if not target: # this is not a target trial
        while not letterSelected: # repeat the content of this loop until a letter is selected
        thisLetter = np.random.choice(letters)# if this is not a target then randomly choose
        if len(presentedLetters) < n or thisLetter != presentedLetters[-n]: # if n letters have not yet been presented, or this is not the same as the n-th trial back
            letterSelected = True # accept this as the chosen letter
else:
        thisLetter = presentedLetters[-n]# if this was a target choose the n'th back
presentedLetters.append(thisLetter)
Note
Remember python functions don’t work online. Rather than using np.random.choice() to randomly pick stimuli, we can instead shuffle() the list and select the first/last item from it as our stimulus. Take a look at the crib sheet for notes on python - javascript translations.
Hot tip in most cases when we are using code components, we want to use the variables generated in our code to update our stimuli. Because of this chronological order, this code needs to be executed before our stimuli are updated for the trail. So, in general, if you are using a code component, make sure ri right click it and move it to the top of your routine.
We covered a few code concepts in this tutorial so let’s play with what we learnt:
Make a basic string variable that represents your name.
Convert that string to a list.
Use a while loop to keep selecting letters from your name until you find one letter you want.
Present that letter in a text component.